Pages

Monday, August 29, 2011

Prepare Today Homemade- Ultimate Veggie Burger


School is in session!!!  Do I hear cheers from all the Mom's across the land :)  I'm kidding (sort of), but with the kids back in school I am making 5 lunches a day.  I am a home lunch maker and I get excited to make fun lunches for my kids, plus I know exactly what is going in their lunches.  I use the Easy Lunch Boxes and they make it so simple to pack my kids' lunches.  
Easy Lunch Box system
 For lunch tomorrow I made Mini-Ultimate Black Bean Veggie Burgers with mini-buns, cheese/lettuce, homemade granola bars, oranges and a peanut butter cracker.  I also packed a small container to hold the ketchup so it didn't make the bun soggy by lunchtime.  The veggie burger recipe is so yummy and when they are warm they look just like grilled meat!  My 8 year old son devoured a test burger and asked for another.  I told him they were for lunch tomorrow to save all my burgers from consumption :)

Sorry about the picture, it was late!


The Ultimate Black Bean Veggie Burger  
(Parents Magazine October 2010)

1 can black beans rinsed and drained
1 medium onion, quartered
1/2 C rolled oats
1 T chili powder
salt to taste
pepper to taste
1 egg
water for thinning if needed

Place all ingredients (except water) in a food processor and pulse until chunky, but not pureed.  If it seems dry add water a little at a time until moist, not soggy.  With wet hands form mixture into patties; refrigerate 15-20 minutes.  (this helps them stay together while cooking) 

Heat a large skillet or griddle over med-high heat and add just enough oil to coat the bottom of the pan.  Cook the patties until browned on each side, about 5 minutes.  Serve on buns with the usual burger fixings.  

(I am going to make these again with added veggies in them, like carrots, mushrooms, and maybe some red onion)

**To make the buns I used my favorite bread recipe and shaped them into little buns and cooked for about 20 minutes.**

These are some of the websites where I get lunch ideas:
easylunchboxes
bento luches 
luches fit for a kid
360 lunch boxes

Saturday, August 27, 2011

Top Ten Signs You Have Enough Food Storage

My goal when starting this blog was to help those who read it to build up a supply of food and supplies.  If you have been following you will notice that I assign monthly goals to be accomplished.  This is mainly for those in my ward, but everyone is welcome to participate.  I felt that having monthly goals would help those that were overwhelmed to get their storage little by little.  As I drive around town or am waiting in line at the store, I watch how many people are around me.  I wonder if these people have a way to sustain their family in an emergency, or are they going to depend on someone (or an agency) to help them.   I have always had an urgent feeling when it comes to emergency preparedness, but lately I have that feeling more and more!  In light of all that is happening, earthquakes, hurricanes, fires, tornadoes, the market crashing, etc., I have a strong feeling that not enough people are prepared for what may come!!


Even if you don't feel the way I do about storage {gasp!} you have to know that if something happened, like an earthquake in Utah, you would need basic supplies after the disaster. Don't count on others to be there for you! And don't count on the stores having what you need!! Stores on the east coast were filled with people gathering last minute items before Hurricane Irene hit.  This picture is from a friend of mine at a Walmart while pre-storm shopping.  She went for some bread....
NO bread left!!  (Kendra Muntz)
 As you can see, if you wait, it's too late!!!  Don't let this happen to you!  Begin today!  Store what your family eats!!  Store what your budget allows!!  As long as you begin, you can slowly build up a supply that will allow you and your family to ride out the storm!!

Read through this list of the Top 10 Signs You Have Enough Food Storage (it's all in fun:) and see how your storage stacks up.  (the list is from HERE)
 
Top Ten Signs you have enough food storage!

10 - The rent for your warehouse is higher than you house payment.
9 - Most of the food you eat is five years old or more.
8 - You have so many rooms filled with bottled fruit you have decided to never move into another house.
7 - When entering your pantry you have a legitimate fear of being crushed by an avalanche of cans.
6 - You are using your stash of pinto beans as collateral for a loan.
5 - Your storage room has a mandatory illuminated exit sign above each door.
4 - One side of your house is slowly sinking from all of the weight.
3 - You have a special provision in your will to divide all the jars and cans equally amongst your children.
2 - You recently asked a new-car salesman if he would take sacks of wheat as a trade-in.
and the Number 1 sign you have enough food storage---Your forklift always needs repairs!


So if you are using some of those excuses when people ask you about your storage, you are free from gathering food for your storage, for the rest of us- Our long-term goal for August is to store GRAINS!  This is a big category so pick one category (pasta, rice, wheat, oats, flour, cornmeal)  and work on that.  The LDS Cannery, Costco, Sam's Club, they all have great prices.  And Remember that coming next month Smiths will be having a case lot sale and you can easily pick up cans of food for a great price.  


Read about all the goals for August HERE!!

Monday, August 22, 2011

Prepare Today Homemade-Zucchini Provencal


Since I am pretty new to the whole gardening thing, I thought I could go out of town for a week and my tiny little zucchini would be a perfect size when I got home.  Are all you experts laughing out of your chairs right now??  Well they say a picture is worth a thousand words, so here you go....
Our super massive zucchini and green beans!!


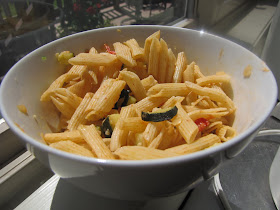
I took the small (ish) zucchini and have been shredding, slicing, dehydrating, baking and trying to find new recipes for this crazy squash!!  I love to go to allrecipes.com and type in an ingredient and see all the recipes that pop up. I did this for zucchini and found this recipe to make for dinner, Zucchini Provencal.  It is actually a side dish, but I made it a main dish by adding pasta to it.


Zucchini Provencal
{I would double the amount of this recipe the next time I made it as a main dish, there just wasn't enough veggies to go with the pasta.}
  • 1 small onion, thinly sliced
  • 1 tablespoon olive or vegetable oil
  • 1 medium zucchini, cubed
  • 2 plum tomatoes, peeled, quartered and chopped
  • 2 tablespoons chopped green pepper
  • 1 garlic clove, minced
  • 1/4 teaspoon salt
  • 1/8 teaspoon pepper
  • 1 tablespoon grated Parmesan cheese
  • 2 teaspoons minced fresh parsley
  • 1-2 C pasta of your choice, cooked

Directions

  1. In a small skillet, saute onion in oil until tender. Add the zucchini, tomatoes, green pepper, garlic, salt and pepper. Reduce heat; simmer, uncovered, for 8-10 minutes or until vegetables are tender. Sprinkle with Parmesan cheese and parsley. (I added 1-2 C of penne pasta to my veggies.  I forgot to take a picture when I made this dish and this was all that was left, so not too many veggies in the pictures, sorry!)
Don't forget to finish your goals for August!  After you send the kids back to school, use your new found freedom to purchase some grains for your storage :)  See all the goals HERE.

Saturday, August 20, 2011

Emergency Preparedness- First Aid Kits

The emergency preparedness goal for August is to make sure you have a first aid kit or take inventory of the one you have.  First aid items don't last forever, bandaids lose their stickiness after awhile and items like neosporin do expire.  

The good news is that First Aid kits can be found at almost any store, and you can decide how simple or elaborate to make them.  I bought a few ready made kits at Recreation Outlet for around $10.  I know that Walmart, Target, Emergency Essentials, etc ALL sell first aid kits.  I would just make sure they have all the basics 
 included in the kit before purchasing.  Remember you will want a smaller kit for your vehicles and also a kit for your work kit.  Check out the travel size section of Target & Walmart for a travel size kit for around $1.  They are a perfect size for your purse.

Here is a basic list from about.com

  • acetaminophen and/or
  • ibuprofen
  • tweezers
  • alcohol wipes
  • antiseptic hand cleaner
  • medical adhesive tape
  • sterile gauze (four inch squares are best)
  • elastic bandages
  • several sizes of adhesive bandages
  • insect bite swabs
  • triple-antibiotic ointment
  • hydrogen peroxide
  • bandage scissors
  • triangular bandages
  • instant cold packs
  • exam gloves
  • barrier device for CPR 
Remember to include a list of anyone in your family who has special medical needs.  Read the link HERE to find out about different ways to help rescue workers know of your medical needs.  

med-Ecase
It is also suggested that we have at least a 3-month supply of over-the-counter medicine & prescription medications on hand.  Talk with your doctor to find out if this is an option for you.  Just picture our world if something happened and the pharmacies were not operational.  There are so many people who take prescription drugs to stay alive, it would be a matter of life or death, literally!!!  During Hurricane Katrina there were victims who were diabetic and were stranded in their homes with no medication.  This story inspired Jennifer Lindley to create a business that makes ready-made emergency kits for people with diabetes, asthma, and (coming this spring) a cardiac kit.  Click HERE to view her website. These are life-saving kits and if you have diabetes or asthma you NEED this in your first-aid or 72-hour kits.  

Don't put off what can be done today!!!  First aid and medications are an important part of everyone's home storage.  

Enjoy the Journey!
Enjoy the Blessings!
Feel the PEACE!! 

Monday, August 15, 2011

Prepare Today Homemade-Italian New Potato Salad

This is the first year that I planted green beans in my garden and I have learned a great lesson. Always leave a week or two between planting seeds and don't plant them all at once :)  I have a ton of green beans!  So having learned this lesson I have had to find quite a few recipes for green beans.  This recipe I found many years ago in one of the recipe books you can buy in the checkout line at the grocery store.  It is actually the only recipe that has survived from that book.  

Photo Courtesy of Bettycrocker.com


Italian New Potato Salad
3/4lb green beans
10-12 (about 1 1/2lbs) new potatoes cut into fourths
1/4 C water
1/2 C Italian dressing or balsamic vinaigrette
1/4 C chopped red onion
1 can sliced ripe olives drained (2 1/4oz)

Cut beans in half and place with potatoes and water in 2-quart microwavable dish.  Cover and microwave 10-12 minutes, rotating every 4 minutes, until potatoes are tender.  Drain.  Toss the potatoes/green beans with the dressing, add onion and olives.  Cover and refrigerate 2 hours or until chilled.  Serves 8.

Click HERE to view the recipe from Betty Crocker.

Monday, August 8, 2011

Prepare Today Homemade-Granola

This month (August) we are storing grains as part of our long-terms storage.  If you have buckets of oats and don't know what to do with them, then this recipes is for you!  I am allergic to nuts so this granola is a basic recipe that you can add many other ingredients to.  Nuts, dried fruit, etc. would be yummy in this granola!


Homemade Granola

5 C. oats
1 C powdered milk (non-instant)
1 T cinnamon
1 can frozen apple juice concentrate, thawed
2 t vanilla
1/4 C oil
Preheat your oven to 300 degrees.  In a large bowl, mix all the ingredients until well blended.  Spread out onto a large, greased, rimmed, cookie sheet.  Bake for 30 minutes, then turn over large sections with a spatula.  Bake another 15 minutes.  Turn granola again and bake another 15 minutes.  Depending on how cooked the granola is and how crunchy you like it, you may cook in 15 min. increments until finished,but mine is usually done after the second 15 minutes.  Let granola cool (remember it gets a lot crunchier as it cools, don't over cook it)  and crumble. Keep in an airtight container. 

We love this with homemade yogurt and sometimes some raisins or cashews! 

Saturday, August 6, 2011

Electric Pressure Cooking

I don't know about you, but my mom cooked with a very scary pressure cooker when I was little.  The little knob on top would shake and rattle and kind of scared us all.  Well, welcome to the 21st century because you will never be scared to use a pressure cooker again!  I attended an electric pressure cooker class at Honeyville Grain, taught by the fabulous store manager Lisa.  

You won't believe what the Nesco Electric Pressure Cooker can do!  It slow cooks, browns, steams, and even browns food before cooking it and THEN it keeps it warm until you are ready for dinner! It would be a great way to cook up your wheat berries to use as a cereal or in salads, and cooking beans will only take minutes not hours.  No more cooking overnight in the crockpot.
Lisa demonstrated how to make several dishes and they were delicious!!  We sampled Black Beans with Chorizo, Salmon with Balsamic Vinegar Sauce, Broccoli, Brown Rice, and Bread Pudding.  Keep in mind the class was an hour and she cooked all of these with 3 pressure cookers right in front of us.  

"You can cook virtually anything in a pressure-cooker-from meats & main dishes to rice and potatoes to vegetables of every description up to and including dessert.  You also preserve more nutrients by cooking under pressure than letting escape in air or water." -Lisa Barker, Honeyville Store Manager
I'm telling you, we have FUN in these classes!!


Head into Honeyville sometime and they will show you everything you need to know about this amazing pressure cooker.  They retail for about $93 and will allow you to toss the rice cooker and the crock pot!!

Don't forget about the August goals!!  See them all here!!

Monday, August 1, 2011

Prepare Today Homemade-Recipe Binder

This post isn't exactly a recipe, but it has to do with recipes. I have been organizing and cleaning my home for the last few weeks.  I love the feeling of clearing out the things we don't use and opening up free space in my home. {not to be filled with new stuff}  The organization has spread all the way into my kitchen and all of my recipes.  I have a confession, I love binders!  I have a binder to organize quite a few things in my home. So it felt natural to want a binder of all of my food storage recipes, categorized in a tabbed, organized binder. So I spent the afternoon clipping and hole punching my way to an organized food storage recipe binder.  :)


I first had to make a cover, you don't have too, I just felt it needed a cute cover. Then I added tabs for every major food storage category. 

{Wheat, Beans, Rice, Pasta, Oats, Dessert, Mixes, Sun Oven Cooking, Dinner in a Jar/Bag, Potatoes, Vegetables, Protein/Eggs, Tortillas, and an Index}

I didn't do a fruit or powdered milk category because I didn't have enough recipes to fill those.  They will get categorized into other tabs. 
Of course I had to add a picture for each category :)


Then I started adding all the recipes that I have collected from magazines, notebooks, cookbooks, and the internet, and now they are all in one location.  I added an index in the back because I wanted to be able to look up an item, say Mexican dishes, and find all the recipes that had Mexican food in them.  Some of my indexed items are powdered milk, cream cheese, chicken, zucchini, etc.  Some of the recipes had crossover items like rice, tortillas, chicken and beans and I wanted to be able to find them.  {do I sound insane yet?}  But it feels so great to have this done! 

Even though I am prepared my kids and husband really don't know where I keep all of our food in the storage room, and I joke that if something happened to me they would starve.  So I showed my husband the binder and said:  "If I should die before I wake, now you'll know what to bake."  He wasn't sure if that was suppose to be funny or not :)  All I know is if we had to evacuate our home this binder will be on my lap in the car, hehe :)


Our 3-month goal this month is to organize our kitchens and pantries.  This is a great way to accomplish the goal. You can make a binder or just keep a notebook of the recipes that you find your family enjoys.  Sometimes little things can help in a big way!