Pages

Sunday, November 23, 2014

Homemade Body Wash

I have had the recipe for homemade body wash on my to-do list for a very long time. Although time hasn't been on my side lately and it got pushed to the back burner.  Well, when you're down the the last drops of shower gel and you don't want to pay the big bucks for a new bottle, you make time to cook up a batch.


The original "recipe" comes from HERE. It looked pretty straightforward.  I mean if I can follow a recipe for homemade bread I can for sure melt some soap in a pan with some water.  Haha!  I did figure out how to make it but there was some trial and error involved.  

The recipe is as follows.  

Homemade Body Wash
3 Bars of Dove soap
6 C. water
Grate the soap into the pan
Add the water
Heat on low and stir until all the soap is melted
Cool in mason jars (no lids)
Pour into body wash bottles or place lids on the mason jars


So here is where my troubles began....

"Just grate it" they said.  "It's so simple." they said. 

After 10 minutes of grating the first bar of soap my arm muscles were burning, my grater felt like it was going to break, and the soap was melting in my hot hand.  It was literally a hot mess!!  I turned to my trusty food processor.  I had read that some people grate their soap in it, so I gave it a try. 


You can't really see it in the picture, but the soap wouldn't budge and I ended up with soap all over the blade and nothing in the bowl.  I pushed the soap harder through the chute and my processor literally stopped.  I think I broke it, but I'm too scared to try and turn it on again. It got cleaned and put back in the cupboard.  (which by the way you would think soap would wash right off of kitchen appliances...it doesn't!  It's so sticky!!)

 I resorted to chopping it up the old fashioned way and what I noticed is that the soap just breaks apart naturally.  I tried to cut the pieces into similar sizes so they would melt all at once.  

 After chopping all three bars of soap I added in 6 cups of water and brought the mixture to a low simmer.  I stirred pretty consistently with a whisk.  Now, I have to warn you.  If you do not like the smell of the soap in it's bar form, then you will be forced out of your home for several hours while the smell permeates your residence.  It was strong!!  It took about 15 minutes for all of the soap pieces to fully melt.  I then poured the liquid into mason jars to cool.


I filled two quart mason jars and let them sit for several hours while they cooled.  They will turn from a runny liquid to a thicker body wash type gel.  I then poured one mason jar into my leftover commercial body wash container and placed a plastic mason jar lid on the extra body wash.  

 I haven't done the math, but I am sure this is a great deal compared to purchasing Dove body wash for upwards of $6.00 a bottle.  It was a messy, soap smelling process, but I will try this again.  I learned what worked and what didn't.  I have been using the body wash for just over a week now and I LOVE it!!! I use one of those poof type spongy things and it foams up just like the store bought stuff.  And the Dove soap really moisturizes my skin.  I have not had that dry itchy feeling after my shower.  I am sure you can make this with any bar soap, I just had Dove on hand.  This was a to-do list win!!

Thursday, November 13, 2014

Post Disaster Meals - No Cooking Required!

*This is a a re-post from Oct. 2012

{While talking to a neighbor last night this post came to mind and I thought it would be a good reminder for everyone. We were discussing what we would eat in the days immediately following a disaster.  Even those of us who like to eat fresh food most of the time, the hours and days after a disaster will require a different approach to eating.  The concept of having at least three days worth of food will go right along side your 72-hour kits.}

Post Disaster Meals--No Cooking Required! 

I read a great post over at Homestead Revival and it got me thinking about the minutes, hours, and first days after a disaster.  What would I be doing?  What would my family be eating, drinking, sleeping on, etc?  Amy, from Homestead Revival, described a situation just like Hurricane Katrina and the aftermath that ensued.  I was inspired by her words and her challenge to come up with enough meals for 3 days that required NO cooking.  This is definitely a challenge!  I do  have ways to cook without power, but in the hours following a disaster I don't know if I will be able to get to my butane stove, and have the sense to even want to think about cooking a meal.  

The first meal that Amy put together was tuna, crackers, a small container of mayo, pickle relish, canned fruit, and small bags of trail mix.  She keeps this in a Rubbermaid type container and has it labeled.  Everything required for the meal would be contained in the box, even a can opener, and there is no cooking needed.  Amy then challenged her readers to come up with their own meals to add to a disaster kit.  I sat and thought what could I possibly have on hand for breakfast, lunch, and, dinner without cooking.  Here is what I came up with......

Breakfast would include:
  • Cereal
  • Shelf-stable milk
  • bowls and spoons


 Lunch  #1 would include:
  • Tuna
  • Saltine crackers
  • Mayo
  • Pineapple (for in the sandwich or a side fruit)
  • Chex Mix


Lunch #2 would include:
  • Peanut butter
  • Jelly
  • Saltine Crackers
  • Oranges


Lunch or Dinner idea:
  •  Soup (different kinds for picky family eaters)
  • Saltine Crackers
  • Spoons & bowls
  • Pears
The soup wouldn't be warm, but it is edible.  


 Dinner would include:
  • Taco shells
  • Black beans
  • Olives
  • Salsa
  • Oranges
  • And I forgot the utensils in this pic :)


Now I need to put all this food into a water safe container with a variety of crackers, more silverware, napkins, and utensils.  I added some peanut butter and crackers at the top of the picture for a snack.  I might just add a few pieces of Halloween candy to keep our sweet tooth happy too!

And don't forget a......


What meal ideas would work for your family??  This is only the beginning, I will have to ponder this subject some more and see what else would work for us!  This idea will supplement our 72-hour kits nicely and having it all in one bin will allow me to rotate it easier, and I know that all our food is in one place.   

Friday, November 7, 2014

Butter Sale!

If you have a Kroger grocery store near you then I have a deal for you!  Butter is on sale for $1.99 when you buy 10 participating items in their Buy 10 Save $5 sale.  Ronzoni and American Beauty pasta are also part of this sale and are only .49 after buying 10 items.  It's a great food storage stock up sale.  But there is only one problem....the butter sold out the first day of the sale! Butter has been really expensive lately so this is an amazing price! If your store is out of butter make sure to get a rain check to secure your price of $1.99lb.  

 Even though my store was out of butter, I took my store ad to Wal-Mart and price matched the butter.  This butter sells for over $5 a pound!!  That is crazy expensive!!  As I was checking out the checker noticed that there were coupons on the front of the package for .30 off of each box.  I got 10lbs of butter for $17.50! 


 I was so excited!  What a steal!  They went right into my freezer.  And I also have my rain check to get more when my store is restocked.  I hope some of you have a Kroger store in your area to take advantage of this deal.

Friday, October 31, 2014

Sneaking Dehydrated Veggies Into Dinner

Dehydrating foods is one of my favorite ways to have food storage.  But sometimes I forget I have jars of it in my pantry.  This is just a quick tip that I used the other night for dinner. I added dehydrated spinach to my pizza sauce before spreading it on the dough.  I'm probably the last person on the planet to figure this out, but I figured I might as well share. 

I simply crumbled the dried spinach in my hand and stirred it into the sauce.  No one knew it was there!  Plus it added a subtle flavor to the pizza that I really enjoyed.  I also love sneaking all that extra nutrition from the spinach into the foods we normally eat.  It was a busy night when I made the pizza and it was a grab-n-go type meal.  A few of my kids were eating it in the car on the way to an activity.  So the pizza with the spinach was dinner and a veggie all in one!  This is just one more way that I use my food storage in everyday living.  Think of all the other dehydrated foods that could be powdered, in a food processor or blender, and then added to soups, stews, sauces, etc. You'll become known as the sneaky chef! Well, if anyone finds out that you're sneaking veggies into their dinner :)   And once you're done with the spinach, sealing up the extra spinach for use later on is so simple using a food saver.  Click here to see how that worksSimple, easy, quick ideas that use my food storage....it's a win!

Tuesday, October 21, 2014

Easy No Knead Artisan Bread

Say you're in a situation where you have no electricity and you want to make bread.  Well, first you'll need to manually grind your wheat, then mix it all up, knead it by hand, (have you kneaded bread for 15 minutes?....not the easiest job) let rise, and then bake the bread over the fire, in a Volcano stove, or in a Sun Oven.  This is quite labor intensive! Kneading alone would have me making flatbread a couple times a week.  Have you ever tried out your manual wheat grinder?  It takes quite a bit of energy for a small amount of wheat flour. The girls over at foodstoragemadeeasy.net shared a really cool bread recipe.  It makes a loaf of artisan style bread with no grinding of flour, no kneading, and needs no electricity to bake.  I wasn't sure I  believed their claims. So I HAD to try it out!!  


Look what the final product was!! I don't know why I was so shocked that it worked, but I was.  I couldn't believe how easy this was to make.  Here's how I did it.....

First of all I followed the recipe from foodstoragemadeeasy.net exactly as they explained it.  Click HERE to see the recipe.  

The first step takes the longest, but doesn't involve any work on your part.  Crazy, right?!  
 The night before you want your bread baked, you need to mix up the ingredients.  It takes 12-18 hours for the dough to rise.  That's the longest part of this recipe, but it just sits on the counter and does it's thing.  Here's what you do:  stir together 3 cups of white flour, 1/2 t yeast, 1 3/4 t salt, and 1 1/2 cups of cool water.  It should be a sticky clump of dough.  Stir it well and then cover with plastic wrap. 

Then let the dough sit for 12-18 hours to rise.  This picture was taken in the morning after sitting for around 12 hours.  


Once the dough has risen for 12-18 hours turn it out onto a floured surface and let rest, covered, for 30 minutes. You may have to scrape the dough out of the bowl to get it into a ball shape.  I folded the dough into itself a few times to get it to stick into a ball shape. 

 Once it's fully rested, place the dough onto a piece of parchment paper and then into a round Sun Oven pan, that was heating up in the Sun Oven.  You can see my bread baking in the Sun Oven out in my yard.  

After about two hours, I took the lid off of the pan and let the bread "brown" for about a half hour.  I did mist it with water to help it brown a little.  Bread cooked in the Sun Oven doesn't get brown like in a conventional oven.  My oven hovered around 300° the whole baking time.  When the half hour was up, I took the bread out and was a little worried.  It almost looked like it wasn't cooked, but it was, and it did have a slightly hardened crust. 


I sliced up the loaf for dinner and was very excited that it worked so well.  It had a definite sourdough taste to it, so be prepared for that.  It isn't a strong sourdough flavor but definitely not a typical white loaf of bread.  It is great to know that even in a stressful, emergency situation that I could make bread for dinner without having to grind flour and then knead it by hand.  Now my next goal is to make this with wheat flour!

Friday, October 17, 2014

Eton Radio and Smartphone Charger

It's amazing what you can find in your 72-hour kits when you go through them.  Remember my funny story, click HERE if you missed it. We found many outgrown items, like diapers and baby formula, and I also found an old manual cell phone charger.  After looking it over I decided that it could almost be called a vintage piece of technology :)


This manual cell phone charger was purchased about 8ish years ago when I had a basic flip phone, and smart phones were few and far between.  The adapters in this kit wouldn't even fit the newest flip phone we had in our junk drawer. And with the smartphones we now own, I needed a new cell phone charger.  

After doing a google search I decided to purchase the eton hand turbine AM/FM/Weather Alert Radio.  What sold me on it was the USB charger on the back of it. It will charge both my Android and the Apple phones in my household. Plus, I can plug it into my Goal Zero unit for charging!  It has a radio, a flashlight, headphone jack, clock & an alarm clock, and is compact enough to fit into almost any backpack, car kit, etc.  Plus it helps support the American Red Cross. 

To charge a smartphone, plug the phone charger into the USB port on the back of the unit. The power from the internal battery will dump the charge to your device.  Once the eton battery is dead it will stop charging your phone.  The hand crank can also be turned to charge the phone, but I imagine that would take forever.  

There are several ways that the internal battery can be charged.  The solar panel on top of the unit, the hand crank, and the USB port.  The first time that I charged the unit I used my Goal Zero unit and the USB port and was fully charged in about 2 hours.  But you can use the hand crank or the solar panel as well.  If the unit has a low battery, turn the hand crank for 90 seconds you will have 5-7 minutes of radio time with the volume on low, or 20 minutes of the flashlight available.  Fully charged you will be able to listen to the radio for 3-4 hours with the volume on low. Using the USB adapter it will take approximately 2 hours to charge. To fully charge the unit using the solar panel it will take 10 hours.  

I purchased my eton radio from Amazon for around $50, but there are other websites that sell them. Click HERE to view the eton website.   Technology changes so quickly these days but I am hoping that this unit will serve its purpose for a while.  So use my mistake as a reminder to check your food storage and 72-hour kits for outdated items.  I don't want anyone to have to say "if I only had taken care of this while I could" in an emergency!

Wednesday, October 15, 2014

The Many Uses of Vinegar

Vinegar is quite the versatile liquid.  It's used in cooking, cleaning, first aid, and it's green! Not green in color, but it's a safe, non-toxic way to clean your home.  Because of how versatile vinegar is, I feel it is one of the most important items to have stocked in your food storage.


I have a few favorite ways that I use white vinegar in my home.  Years ago I found  some easy "recipes" for cleaning, and they were so easy to make, because who wants to spend all day making cleaning solutions. These mixes are so simple, you'll be thinking that making homemade cleaners should be more involved, but that is the beauty of using vinegar.  Simple and easy!!!  We have also been conditioned to think that if a cleaner doesn't smell toxic, it isn't sanitizing.  Vinegar, when sprayed along side with hydrogen peroxide, will sanitize surfaces.  Yes, vinegar has a smell, but it won't harm your lungs like bleach or ammonia.  It dissipates after drying.


 Wood Floor Cleaner/Window Cleaner
The ratio is 2/3rd's white vinegar to 1/3rd water.
I marked my spray bottle on the side with black lines so I know where to refill it when it's gone.  
Add a few tiny drops of Dawn dish detergent.  
Shake before using.
Use on glass, wood floors, laminate floors, stainless steel appliances, etc. Wipe surfaces dry with cloth or paper towel. Use a microfiber mop on floors.


Disinfectant Spray
Fill one spray bottle with white vinegar
Add a spray topper to a hydrogen peroxide bottle.
Spray both onto counter top surface. 
Let sit for one minute before wiping.
Wipe with paper towel or cloth towel.
It doesn't matter which is sprayed first.  
DO NOT MIX VINEGAR AND HYDROGEN PEROXIDE IN A SPRAY BOTTLE AND STORE IT!! IT CAN BE HARMFUL!  
Overtime it will also become less effective when mixed together in a spray bottle.
But when applied using two different bottles it will sanitize surfaces. 


Other Uses For Vinegar
  • This idea is for a situation when we are doing laundry manually.  Have a spray bottle of vinegar on hand and use it to refresh your clothes.  Doing laundry by hand will be tough, so to stretch the time between doing laundry shake clothes to free loose dirt and debris, hang up the clothing, spray with vinegar. Once dry, the vinegar will have deodorized the clothes and you can wear them awhile longer before a deep cleaning is needed.  The vinegar smell will dissipate after it dries.
  • Use a mixture of vinegar and a small amount of water to clean blinds and shutters.  Place an old sock on your hand, dip into the vinegar mixture and run your hand over the blinds or shutters. 
  • Place a bowl of vinegar on your kitchen counter  overnight to absorb the smells from cooking dinner.   
  • Add a small amount of baking soda to your drain and pour in vinegar.  This will bubble and clear out small clogs in the drain.
  • Spray straight vinegar onto weeds around your garden.  It will kill them! Be careful not to spray the plants that you want to keep alive :)
  • Run a cycle in your dishwasher with vinegar in the detergent cup.  It will clean and refresh the inside of your dishwasher, especially if you have a stainless steel interior. 
  • Add a cup full of vinegar to your rinse cycle when doing laundry.  It breaks down the alkalies in the detergent. 
  • Spray your fruit and veggies with vinegar and then hydrogen peroxide, let sit, rinse with water. This will remove unwanted pesticides. 
  • Spray a mixture of water and vinegar on a sunburn to soothe.
  • For minor kitchen burns. Run cold water over the burn for a few minutes, then place a cloth that has been soaked in one part water to one part vinegar, place on burn to soothe.  Repeat as necessary.

The ideas above use white distilled vinegar but there are so many other uses for other vinegars, like apple cider vinegar. The internet will fill you in on all those benefits.  But my love for vinegar in everyone's food storage is because it has an almost indefinite shelf life and it's cheap!!!  Everyone can afford to store vinegar.  Stock up the next time you head to the store!  Plus it's so liberating to skip the cleaning aisle. 

Monday, October 6, 2014

72-Hour Kits and What Not To Do!

Knowledge is power...only if you apply that knowledge to your goal.  I know a lot about 72-hour kits and what to put in them.  But maybe not so much about updating them :)

This weekend was the semi-annual General Conference for members of the LDS faith.  This conference is held in April and October of every year.  Many of us use the bi-yearly time to change out batteries in smoke detectors, inventory our food storage, and change out our 72-hour kits.  It's funny that April and October seem to come around a lot faster then we think.  I swear it wasn't that long ago that I had gone through all of our 72-hour kits.  But the proof will show you......that wasn't the case.  

Case in point #1

 My daughter said that even if that was all there was left to wear, she couldn't fit into it.

Case in point #2

 My son is 11 and I'm pretty sure he doesn't wear diapers anymore.  It was hard to take a picture because we were laughing so hard!

Case in point #3

 This child is 18 and had a coat that fit my 6 year old.  We were laughing really hard by this point.  I could hardly take the picture when she zipped it up.  She laughed and said at least she would be partly warm if she had to wear it.  haha!!

Case in point #4
My 6 year old had a bottle and baby formula in her kit.  She would probably have fun drinking out of the bottle, but the formula not so much. She didn't even have a toothbrush in her kit like the rest of us. She didn't even have teeth when I made her kit...haha...now she is losing her front teeth. 

How did I not go through these kits in the last 5 years?!?!?!  I did move a year and a half ago, but still, I'm a slacker.

 This was most of the expired food from all 7 of our kits.  It was mostly yucky. The smells...I can still smell them.  My kids added new clothes, in the correct sizes, in their kits, and I have a list of things to buy to bring them all up to date. I think that these kits were not on my mind because I feel that an evacuation in my area wouldn't be likely, it could happen, but not likely.  So I probably put the thought of updating them out of my mind. Having a 72-hour kit, or grab-and-go kit, or a bug-out-bag is a smart thing to have though. I'm not saying that they aren't important. No one knows what the future will bring and it's always a good idea to be prepared for whatever may come our way.

Saturday, October 4, 2014

Quarantine

The news lately is filled with the words ebola and enterovirous. They are both diseases that are causing trouble for many people.  As I was listening to the news the other day, they were discussing the family in Texas, whose father has ebola, and mentioned that the family was quarantined for 21 days in their home.  They are not supposed to leave their home for 21 days!

Could you, right now, stay in your home for almost a month and have everything required for a normal, every day routine??

Think of all the items you use every day.  From fresh foods all the way to toilet paper. Do you have at least 3 weeks worth of food and supplies?  


 Before A Quarantine....

  • Always have at least a month's worth of food in your home. (I highly recommend a three-month supply, but we'll start with 1 month)
  • Water storage will also be necessary. Make sure you have a few cases of water on hand.
  •  Hand sanitizers, lysol, bleach, Clorox wipes, etc.  Whatever your choice of cleaner is, store it!  I would recommend not using sponges, but have paper towel, or small towels that you can wash in hot water.  You don't want to spread germs, you want to kill them.  This is also your first line of defense before getting sick!  Wash your hands often!
  • Have a few simple meals ready to go and store all the ingredients together.  If the cook of the family becomes ill, it will be handy to have meals ready to cook, stored all together.  
  • If your family becomes ill, think of foods that would be comforting, and kind of bland.  Crackers, soups, applesauce, jello, pudding, ingredients for smoothies (freeze-dried and dehydrated fruits are great for smoothies), liquids like Gatorade, water, and juice.  Remember the BRAT diet: banana, rice, applesauce, toast. (and when I say "ill" I mean a flu or other sickness, not ebola. If you feel you might have ebola or enterovirous please go to the hospital)
  • Whatever over-the-counter meds you use should be stockpiled in your home.  If you have children, you'll need children's medicine, adults need the adult strength.  Think of cold medicine, fever reducing, pain relieving medicine, etc. 
  • Do you have ice packs, heating pads, or a hot water bottle?  They can go a long way in helping someone feel better.
As you go about your day tomorrow think of all the things you use, and eat, and drink during your day.  Do you have at least a month's worth of each item?  If not, make a list of all the items you're in need of, so you can start shopping and begin adding to your stockpile.  Your friendly neighbor may become not so friendly if you have to be quarantined. Take the time to prepare for your family today!  You can't count on someone being there to help you.

Thursday, October 2, 2014

Butter Drought


Butter is one amazing food.  Cooking without butter would leave our plates really dry and flavorless.  I'm no Paula Deen but I do love butter in my cookies, quick breads, and on top of baked potatoes.  Have you seen the price of butter at the grocery store lately?!?!  It's almost $4.00 a pound!  That is crazy!  Last fall I bought butter for $1.50 and that was a stock up price.  I saw butter for $2.97 at my grocery store and I bought all I could.  This is a good reminder of why we need to prepare.  Inflation!!  Buy food now while it's affordable.  

*remember to have a back up (or two) for your fresh foods*

Usually I have about 20lbs of butter in my freezer and it is enough to get us through until the next sale at the grocery store. About 2 weeks ago I was down to my last pound of butter.  I didn't worry because I figured a sale was just around the corner.  But, no sale came.  Meanwhile, to get us through the butter drought, I made some butter from shelf stable cream that I had in my storage.  Shelf stable cream is my first choice for spreadable butter.  It's delicious and tastes like fresh butter.  We wanted to savor it though, and so it was only used it for toast.  Click HERE to see how I made the butter. Even though it's delicious, it would take a lot of shelf-stable cream, to make butter, to use every time I needed it for a recipe.


 Powdered butter is my go-to option if fresh butter isn't available.  I still wanted to bake and so my second choice for shelf stable butter is Thrive's butter powder.  I LOVE Thrive's butter powder.  You can read how I taste tesed it HERE.  I was able to bake cookies, make mashed potatoes, pumpkin muffins, and even a cream sauce for macaroni and cheese, and it all worked. It is a really amazing product.  I highly recommend it! Sign up for their emails and buy a can when they have a sale.  (A #10 can is around $28.00 right now on thrive.com and a #10 can equals 24 sticks of butter. Which makes it around $4.60 a pound. I have only purchased my powdered butter when it was on sale to lower my price per pound. )

I am hoping that my butter drought will be over as soon as the holidays are here.  Most baking supplies will be on sale in the next few months.  But if the demand is high and supply is low....our price at the store will skyrocket.  Food storage isn't just for the end of the world. 

Friday, September 26, 2014

When The Lights Go Out

There have been several times when the power has gone out at my house, but never longer than a few hours.  And most of those times were in the middle of the night while we were sleeping and we didn't need an alternate source of lighting.  I took note the other day of how often we used the lights in my house, and the switches are flipped without a second thought. The habit of turning on a light switch when we walk into a dark room is engrained into all of us.  We take for granted that with the flip of a switch we have light.  

What Do You Use For Light When The Power Goes Out?

I live in earthquake territory and I have a feeling that with my luck we will have an earthquake in the middle of the night and flashlights will be a prized possession.  (that is totally my own opinion and I have no idea when the earthquake will hit, but with my track record of bad things happening at the worst times, it will :)

Flashlights
It is recommended to have flashlights by every bed in your home to be used during a power outage.  With kids it may be harder to keep those flashlights by the bed, but I took a few photos of the flashlights/emergency lighting in my home.  This will show you what types we use, and also give you some ideas on what types of lighting are out there.  It is by no means the only way to have lighting in an emergency, but maybe you'll find a new gadget that will work for you.  I am always finding new gadgets to add to our flashlight collection.  

  
Under the Bed-  Keeping a flashlight under your bed, inside a pair of sturdy shoes, allows you to grab and go in a disaster.  I need to take this one step further and put my shoes and flashlight in a bag that ties to the bed post.  If there was an earthquake, objects would be falling all over the place, and hunting for my shoes and flashlight in the middle of chaos would prove difficult.  
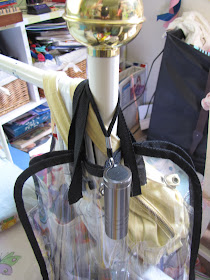
LED flashlight
 Flashlights in the Children's Room-  Each of my children have a flashlight that hangs on their beds.  Yes, I know what you are all saying and it's true.  They play with them, and lose them, and to be honest 5 out my 5 kids didn't have a flashlight hanging on their bed when I went to take a picture today.  I had a challenge to see who could find one first so I could take a photo.  I need to stay on top of things like that and make sure they keep the flashlight within reach.  It's one more thing to have to remind the kiddos to do, but it's necessary in an emergency.


Shake flashlight
 My son keeps his shake flashlight on his window sill.  (And yes his bed is next to the window and under a large shelf,  and that is probably breaking every earthquake safety rule out there.  I'm not perfect and this proves there is always room for improvement.:)  The flashlight in his room is a shake flashlight.  I don't recommend this kind of flashlight because it takes so much physical power to light the darn thing that it's frustrating.  But my son is 9 and loves things that work and so he chose that one.  My girls have regular LED click on flashlights and also the squeeze flashlights.  Those are similar to the shake variety but you squeeze the handle until you have enough energy for the light to work.  Still not my favorite, but a little easier than the shake kind.  Also note that I don't have a picture of the squeeze flashlight, none of the kids could find theirs :)


 UV Paqlite-  
These reusable glow sticks are one of my favorite gadgets on the market.  I found these at the Self Reliance Expo last year and I was sold on the idea.  The stuff (real technical I know) in side of the tubes and the plastic case glow after being held up to a light source.  They can be used over and over again and any light source will work to give them their lighting ability.  Hold them up to a car light, the sun, indoor light, campfire, etc and they glow for a very long time. I hang mine in our central closet so they don't get played with or lost.  They aren't bright enough to use like a flashlight but in a tent or small room they would give off enough light to see what was going on.  Think of a nightlight in your kids room, that kind of illumination.  Click here to see my previous post on the UV Paqlite. And click here to visit their website and view all of their products.


Solar Lighting-  
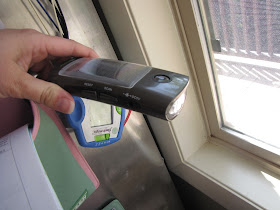
I really like having a solar version of a battery operated flashlight.  I leave the one above hanging on my refrigerator to keep it ready to go.  It is also a radio.  Having batteries on hand for flashlights is a great idea, but you do need quite a few batteries for any extended power outages.  It's a great idea to have a back up plan. (Remember having a plan B for your plan B.)   Solar flashlights come in all sizes. 

I keep a small solar flashlight on my nightstand, and it's a great option when the lights go out.  Solar powered garden lights are an inexpensive, easy way to have light without power.  Group them together in a #10 can or mason jar to light a kitchen or family area at night.  Set them outside, or in front of a sunny window to soak up the sun during the day, and light your home at night.  

Solar powered garden lights

 Another option on the market are products from the Goal Zero company.  The generators charge using the power of the sun (they can also be plugged in an electrical outlet). I own a smaller unit that charges phones and has power for smaller devices like computers dvd players.

Goal Zero generator and camping light
Goal Zero also carries a variety of solar lighting.  I own the lantern accessory and I highly recommend having it to go along with a Goal Zero solar generator.  Click HERE to view all of their products.  


Battery Powered Lanterns and Oil Lamps- 
I bought these lanterns at Walmart for around $10.  I do have to store extra bulbs and batteries, but they are one more way to have light in an emergency.  The Emergency Essentials 100-hour candle is also a great resource for light and they are inexpensive. Another option that uses regular cooking oil is called the Safer Emergency Candles.  Click the link to read about I tested out the Safer Emergency Candles, READ HERE.

Candles- 
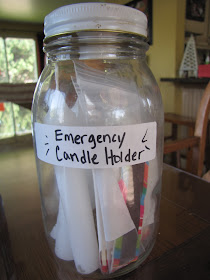
 Candles are inexpensive, easy to use, and are a great item to have on hand. They give off a great amount of light and are probably the most common item people have for lighting in an emergency.  Use caution with candles, especially around children and pets. To keep my candles from rolling all over the place I made a candle holder out of an old mason jar.  It holds a burning candle on top, set in a PVC cup,  and the extra candles and matches are stored inside. After you are done using the candle, all the supplies store neatly inside the jar.
All the items needed can be found around your house and at the hardware store. The mason jar is from my storage room, and the candles and matches were both from the dollar store. A small piece of pvc pipe is needed to hold the candle in place, but it was under one dollar at the hardware store.  I placed the matches inside a small bag, and in another bag I placed the striking strip from the match box.

You Will Need:
quart size mason jar
canning lid and ring
candles that fit in mason jar
matches and strike strip
small PVC cup (from sprinkler section of the hardware store)
E6000 glue, or other permanent bonding glue

Glue the PVC sprinkler piece (from the sprinkle section of the hardware store), onto the underside of a canning lid, this will become the candle holder, and let dry.  (When not in use the lid is turned over and the PVC piece is stored inside the jar.)  Once dry, store the candles, matches, strike strip in the mason jar.  Close the canning lid with the PVC piece inside the jar, and your emergency candle is now ready.  When you need to light a candle, flip over the mason jar lid so the PVC piece is facing upwards,  tighten the ring around it, place a candle in the PVC holder and light it.  So easy, but so useful too!!  I love that my candles aren't all over the place and I have a safer, steady holder for them. Just a note- take your candle with you to the hardware store to save a ton of time from having to drive back for a different size that fits :)
PVC sprinkler piece glued to the canning lid.

There are many options for lighting in an emergency.  Find what works for you! Having multiple sources of lighting will only make your life less complicated when you need to use them.  It doesn't necessarily have to be a natural disaster to need a flashlight.  The other day I needed to look under the stove for a my kids bouncy ball and I knew right where to find a flashlight.  (obviously not from my kids' room :)  Take stock of your flashlights and batteries and make sure you know where they are. Being organized and ready NOW will pay off when you need to use your lighting for an emergency!