Showing posts with label saving money. Show all posts

Wednesday, May 18, 2016

Making Yogurt With Acidophilus Tablets

Print Friendly and PDFPrint Friendly
Making yogurt is a skill that will save you money and also allow you to make several other things, like cream cheese or sour cream, out of plain yogurt.  I have been making yogurt for a few years now and I have tried many different ways and have found what works and doesn't work.  I started making yogurt with regular milk from the grocery store but milk started to get expensive so I switched to using powdered milk.  For a yogurt starter I have tried regular, plain yogurt, dried starters, and even a forever starter that gets used over and over.  They all worked but my goal was to be able to make yogurt without having to use a refrigerated starter.  I do keep plain yogurt in 1/2 C measurements in the freezer, but that will still be a problem if there wasn't electricity.  My husband has always laughed at the fact that you need yogurt to make yogurt, but I think I have found a way around needing refrigeration for a starter.  One of my favorite websites is myfoodstoragecookbook.com  and that is where I learned about acidophilus three billion.


Acidophilus Three Billion is a probiotic that aids in digestion, but it is also the live cultures needed to make yogurt.  Instead of using plain yogurt with live cultures, use the acidophilus tablets instead.  (I bought mine on Amazon, but health food stores should have it too) Take note that the incubation period for the yogurt will be quite a bit longer, like 18-24 hours, before it starts to firm up.  Normally, with a plain yogurt starter, I would get the yogurt started in the morning and it would be setting up in the fridge by dinner time.  I made yogurt with the acidophilus and started incubating at 9am and I let it sit until about 10am the next day.  It wasn't bitter, like yogurt can get, it just took longer to set up.  I also made the yogurt in my Saratoga Jacks Thermal Cooker and that was a great option if I didn't have electricity.   I usually use my yogurt maker, and I'll have to try my next batch with my tablets to see if the yogurt comes out any differently.  


This is how I make yogurt.  You will notice that I don't heat up my milk and then let it cool. If you are using powdered milk you can skip that step.  If you use regular milk from the grocery store you will need to heat up your milk to 180 degrees and then let it cool to 100-110 degrees before adding your starter.  Don't let it cool to under 100 degrees or the starter won't "start".  It will stay in kind of a hibernation state.


Start by putting 3 3/4 C water and 1 C powdered milk into a blender.  Blend until combined.  Allow a few moments for the frothy milk to settle to the top.  You can scoop it off at this point and discard.  I add 1/3 C sugar and 1 T vanilla flavoring to my yogurt unless I am planning on making sour cream with it.  My children really like a little sweetness and flavor to their yogurt. I used to give them honey to mix in but the yogurt would get runny and they wouldn't eat it.  If you really don't care to use the sugar you can try a sugar substitute.  


Pill Crusher that I bought on amazon.com.


Using a pill crusher, crush 3 acidophilus tablets and add to a little of the blended milk.  Add it back to the blender and just stir to combine.  


Pour the milk into a clean, warm quart jar.  This recipe makes enough yogurt for one quart.  (I fill my mason jar with hot water while I make up the yogurt.)


There are several ways to incubate your yogurt but I decided to try my Saratoga Jacks Thermal Cooker.  If you don't have one try a small cooler or wonderbox.  Just make sure to have little or no air space around the jar.  I filled my cooker with the hottest water I could get out of my faucet, which was around 125 degrees.  Anything hotter will kill your starter.  After 8 hours I did switch out my water for hot water again.  The yogurt won't set up if it is too cool either.  Try to keep it above 110 degrees.  Don't let all of the temperature info scare you away from making yogurt.  It really isn't as hard as it may seem.  


Here is my yogurt after about 24 hours of incubation.  It is now in the fridge cooling off.  I tasted it and it was smooth, creamy, and just sweet enough.


Powdered Milk Yogurt Recipe
3 3/4 C warm tap water
1 C non-instant powdered milk (milk from the cannery)
2-4 T plain yogurt with active cultures OR 3 Acidophilus tablets, crushed
1/3 C sugar
1 T vanilla


Combine the water and powdered milk in a blender or use an emulsion blender.  Scoop off the foam.  Add the sugar and vanilla and blend.  Add the starter to a little of the milk from the blender and stir to combine, then add back to blended milk.  Use a spoon and stir gently to combine.  Pour into a warmed quart mason jar and incubate.  Wrap tightly in towels and place in a cooler or use a thermal cooker.  Fill the thermal cooker with hot tap water and place mason jar inside.  If using a yogurt starter your yogurt will be ready after about 8 hours.  Place in fridge and allow to firm up.  The thermal cooker can take up to 24 hours.  I checked it about every 8 hours.  


I filled my jars with warm water to heat them up.


Now you can have yogurt anytime, even in an emergency.  The cooling of the yogurt after incubation could be done with a cooler that has been buried under ground (with the lid open at the top) or in cold storage, but that is a whole other post :)


Click HERE to view another post on how I made yogurt in my yogurt maker and even how I made yogurt cream cheese :)

Friday, October 9, 2015

Prepare Today Homemade- Easiest Muffins EVER!

Print Friendly and PDFPrint Friendly
Self-Reliant Saturday Recipe

 We are a family that loves a good muffin.  We eat them for dinner about 3 times per week.  Muffins are pretty simple to make, but sometimes getting all the ingredients out on a busy night is just too much for me.  I do try to bake a double batch to freeze but I don't always remember to do that.  I think I have found my secret weapon to make muffins quick and SO easy!!  I thought cake mix cookies were easy to make, this recipe is even easier!

You may have heard of the 2 ingredient pumpkin cookies, which include a box of spice cake mix and a small can of pumpkin.  You mix and bake, so easy!  Well, I thought why couldn't that dough also be made into pumpkin muffins??  And guess what?  It worked and the whole family loved them!

  In the fall the grocery stores will generally have spice cake mix for a great price.  Last year I stocked up on them because we really like pumpkin cookies made out of it.  Having all the ingredients on hand added to the simplicity of this recipe. In the picture I used only half of that can of pumpkin because it is the bigger can.  The recipe only calls for a 15oz can of pumpkin. 

 Mix the cake mix, pumpkin, and a few chocolate chips and you have muffin batter!!!  And with no oil or eggs, these muffins are a low-fat option for dinner.  They do have sugar from the cake mix, but not nearly as much as when I make muffins from scratch.

Pumpkin Cake Mix Muffins {or Cookies}
1 box spice cake mix
1 15oz can pumpkin
1 C chocolate chips

Mix the cake mix and pumpkin together with a hand mixer, add the chocolate chips and divide into 12 muffin cups.  (I had extra batter and I made about 8 mini muffins too)  **Bake at 375° for 18-20 minutes.   They could also be baked in a sun oven or volcano stove in a situation without electricity.
**I live at an altitude that I need to follow the high altitude directions and my cake mix said to bake the cake mix at 375°.  If you are below 5000ft you might need to adjust the temperature to 350°.

To make cookies:  Mix as directed above and bake at 350 for 8-10 minutes.  Let cool for a few minutes on the cookie sheet, then remove to a cooling rack.

And if you need a dessert idea, we made these tonight and they were so good and again....only 2 ingredients!!!  Click here for Pumpkin Brownies!!

Saturday, July 25, 2015

Self-Reliant Saturday-- I Can't Afford Food Storage

Print Friendly and PDFPrint Friendly
It's all about PRIORITIES. As with most things in life that we can't seem to get to, or finish, it's all about how important it really is in our lives.  Maybe take a minute and reprioritize the things you feel are most important in your life, and see how to fit food storage in.

Saturday, June 6, 2015

Self-Reliant Saturday-- Don't Forget The Flavor In Your Food Storage!

Print Friendly and PDFPrint Friendly
Summer is here and that means BBQ's, picnics, and outdoor fun!  This is also the perfect time to stock up on all the foods that go along with those cook-outs.  Watch the grocery ads for ketchup, mustard, salad dressing, bbq sauce, relish, mayo, and spices.  These types of foods add flavor to your cooking.  Basic food storage will only be tolerated for so long by a hungry family.  Don't forget to stock up on the condiments and spices that add flavor to your food storage!  Paper products like plates, bowls, napkins, cups, plastic utensils, and paper towels are also on sale.  Who wants to do dishes in an emergency?!  Your challenge is to stock up now while the prices are LOW!

 And don't forget about all the camping deals out there. Take advantage of the great prices on tents, camp stoves, sleeping bags, and all the gear that goes along with camping.  Restock your 72-hour kits and car kits with camping tools, gloves, collapsible shovels, tarps, etc.  Father's Day and Fourth of July sales are the best time to purchase larger items for a great price.  Sometimes you can find great deals at the end of the summer season, but if you really need a tent and find a great price, buy it!

Saturday, January 10, 2015

Everything In Its Place...Organizing The Storage Room

Print Friendly and PDFPrint Friendly
How are all of your January resolutions going? Did you read my last post on my food storage goal for 2015?  Click HERE is you missed it. Since it's still January, I'm going to continue with the organizing theme.  Remember...

A house of order can transcend to all aspects of our lives, but let's start with our food storage.  I hope you were all able to accomplish the organizing assignment in the last post.  The assignment was to inventory your food storage pantry or storage room.  This may seem monumental but I promise it will help in the long run of having a useable food storage system.  (Scroll down the page to see a picture of how I keep an inventory on a white board of all my #10 cans.)


After inventorying your food and supplies the next step is to organize your food into a system that functions for you.  
I am going to show you what works for me and what keeps my food rotated and useable, but there are many other ways to organize your food storage and I'll mention those at the end of the post. 

I have been blessed with a large storage room where I keep all of my extra smaller cans, #10 cans, bulk foods, paper goods, etc.  This is the room that I go to when I need to refill the containers in my kitchen pantry.  The pictures in this post are going to be dark, I apologize but there isn't any natural lighting in this room. Which is a good thing for food storage!  Remember that light, temperature, moisture and bugs/pests all need to be considered when you pick an area for your food storage. 

In my storage room I try to group "like" items together.  That way I usually know where everything is and goes.  I group my #10 cans in a different area then my smaller cans.  The smaller cans are stored in my kitchen and I only keep them out in the storage room when I have too many to fit in the kitchen. 

This is a small sampling of how I organize my #10 cans of dehydrated and freeze-dried foods. 
I have most of my fruits and veggies grouped together.  This helps with knowing how much I have, but it also helps my kids know where things are when they are sent out to the storage room to grab something for me.  The powdered milk and other dairy items like sour cream powder, buttermilk powder, powdered eggs, freeze-dried cheese, powdered shortening, and powdered butter all get stored together.  I also have baking supplies like baking powder, baking soda, and cocoa powder on that shelf.  There is actually a shelf below the milk shelf and it holds my salt, oils, cornstarch and any other baking items that I might buy in bulk.  

How do you store oddly shaped containers, like condiments?
I use the free boxes I get from case lot sales and food storage retailers to group them all together on a shelf.  I also live in earthquake territory and I feel this gives me added protection if the room started shaking.  I really need to instal a small lip on my shelves so things don't go sliding off, but that is on the to-do list :)

All of my bulk items like wheat, oats, rice, sugar, etc. are stored in buckets around the perimeter of my storage room.
I love gamma lids!!  They make it so easy to open and close, and it doesn't feel like such a chore when I need to refill my kitchen pantry containers.  It is very dry where I live so I don't use the mylar bags inside of my bulk buckets.  I pour the bulk bags directly into my buckets.  And I am also comfortable resting them directly on the concrete.  Some may not feel comfortable doing that, but my room doesn't fluctuate in temperature too much and the concrete doesn't get wet.  I feel the chemicals from the concrete are not leaching into my buckets.  This is one of those examples of what works for me may not work for you ;)

And finally, this is how I keep track of all those #10 cans of food.
In all honesty here....this is my goal....to update this white board.  Notice I didn't take the picture too close...haha.  This proves I'm not perfect and I need a food storage refresher too.  The cans that get used the most are the fruits and veggies, so they need to be updated first.  But this is how I keep a visual of what I have.  Some cans are things that I won't use unless I absolutely have too, like the canned cheese and butter.  But having it listed on the board with hash marks allows me to know at a glance what I have in my storage room.  

Other Food Storage Options
 Some people may like using the commercial can rotater systems, but I don't have the room for them.  I have found that I can easily add newer cans to the back of my shelf without having a rotating shelf.  But you can decide if that will work for you.  You can also store like items together or groups of ingredients into complete meals.  Like the meal in a bag idea. Or maybe you like to make meals in a jar. Or maybe storing your food like the grocery store, with different types of food together, like Italian, Mexican.  I know of some people who like to store their food according to breakfast, lunch, or dinner meals.  It's all up to you!! It is really up to what works for you so you will USE your food storage!

Remember this rule with any food storage system....
F.I.F.O


This is how you rotate your food!  Always place the newer foods in the back.  This may seem tedious and hard to do but knowing you are using the oldest food first will save you a lot of $$.  Take the few minutes when you buy your food to put them in the proper place...behind the older food! 

Food Storage in Smaller Homes 

Many of us may live in smaller homes or apartments.  How is is possible to have food storage....and to store the larger amounts of food needed?
  • Think of the space under the beds in your homes.  For long-term foods (#10 cans that lasts 20+ years) they can be stored in their boxes under a bed.  Think about taking the bed off the frame and using the food storage as the base.  The food from the cannery like rice, wheat, oats, powdered milk, would all work great for this option.  They don't need used as often. 
  • Do you have extra space above your kitchen cabinets?  This unused space could easily store cans of food.  
  • Instead of end tables, place stacked cans under a tablecloth and use a wood or glass topper to create a small table.  
  • The space behind your sofa and the wall can hold food storage as well.  It can be covered with a cloth or if you know someone handy, they could build a cover for it out of wood. 
  • Do you use all that extra closet space on the shelf above your clothes?  Think of how high you could stack #10 cans if they went all the way to the ceiling of the closet.  
  • Buy several over the door pocket hangers, that are made for shoes, and you'll have a great area for smaller items. Think of all the doors and closets that you have and think if an over the door organizer would work there.  
**All of the above ideas take organization to a new level.  You will need to have a record of what you have stored and where you put it.  Keep a notebook with every item listed, where you put it, how much you have stored, and the expiration date.

It takes a little creativity and thinking outside of the box, but I know if you make it a priority to have your food storage you will be blessed.  Thoughts and ideas will come to your mind as you pray to know how to prepare for your family.  

Wednesday, July 16, 2014

Back-To-Basics Money Part 2: Frugal Food Storage

Print Friendly and PDFPrint Friendly
Stocking up on life's essentials, plus food storage, can cost quite a bit. Being frugal is something I take pride in (my email is jrfrugalmom@gmail.com) and it's also how I am able to feed a family of 7 and still stock up on food storage and emergency preparedness supplies. For the most part I watch grocery sales and ONLY buy things on sale.  We don't eat out very often and hardly ever go to a movie, but we do rent movies and have cookouts in the backyard for family fun.  It's all about priorities and realizing that even if you miss the latest movie, life goes on, and most likely that movie you missed will be online or tv later.


I have written a few posts on frugal food storage because I feel no one should go into debt to acquire food storage.  Here are some of the ways that I save money while still stocking up.
 
 Click HERE to view a post on Frugal Preparedness.  It's all about shopping for preparedness items in the least likely places. 

Click HERE to view a post on inexpensive First Aid Supplies.

Click HERE to read all about making your own cleaning supplies.  The granite cleaner is my FAVORITE!!!!!!

Make your own crackers and save a ton of money!  Click HERE to see my favorite recipe.

Save money by making bulk mixes.  Click HERE to see that post.

Extend the life of your fresh produce by using these tricks.  Click HERE to see how!!

And click HERE to see how one blogger friend of mine affords her food storage....for only $10 a week.  


Excuses, Excuses, Excuses............
One of the excuses that people have for not having their food storage is that they can't afford it. I am here to tell you that you CAN afford it.

  • Eat out less
  • Take advantage of sales
  • No impulse buying
  • Cook from scratch (anything a manufacturer can make, so can you)
  • Plan menus!!
  • Entertainment: stay home, use the library, buy second hand
  • Keep your car longer
  • Have a money jar for spare change (cash in the change and use for your 72-hour kit or to buy food storage items)
  • Be Thankful: if you are constantly thinking of things you have to have you won't appreciate what you are blessed with.
Most of us DO have money we could channel into food storage but without focus it is all too easy for the money to slip through our fingers. Keep this in mind: (all the cans are #10 cans size)
  • magazine subscriptions for a year can be around $40=1 year supply of canned spaghetti
  • Wii games are $49.99=6 cans of sugar, 6 cans of pinto beans & 3 cans of oats
  • Movie tickets for 1 child and 1 adult (no snacks) $17.50= 6 cans of potato flakes
  • DVD's cost $19.99=7 cans of white rice
  • E-books cost $14.99 (average)=8 cans Hard Red Wheat
  • Red Lobster dinner for 2 $50= 9 cans of apple slices
  • New hardcover books $17-$25= 6 cans macaroni
Just keep in mind where the money spent is going and think of some alternative ways to find the items that you feel you have to have. Renting dvd's and borrowing movies and cd's from the library are some options. If you make your food storage a priority you will find ways to finance it. I love this quote:

 "The money slips through our fingers as we munch our way through life's countless Burger-McWendy's or avert our attention from the fact that PayPal really isn't always our pal". 

All we have to do is to decide, commit to it, and then keep that commitment. Blessings and miracles will happen!

Monday, July 14, 2014

Back-To-Basics Financial Reserve

Print Friendly and PDFPrint Friendly
The last focus for the big three of the Back-To-Basics series (1. Water, 2. Food click on the back-to-basics tab above for all the back-to-basics posts)  is Money.  Not necessarily the easiest topic, but here we go.


We all use money, everyday.  Our lives depend on how much is coming in and going out.  Why do we need it in our food storage?
  • money is needed to buy your storage
  • money is needed in times of stress such as: job loss, extended sickness, bread earner in college, economic distress
  • small amounts of bills will be needed if there is ever an emergency that knocks out power.  No ATMs will work and neither will credit card machines.  
Today we live in a society of thinking that we can just go buy a new one, of almost anything.  We need to retrain the way we think, and hold onto what we have for a little longer.  Sew clothes instead of getting new ones, hold onto our cars for a few years longer, learn to cook from scratch and not buy convenience foods, make do with what we have.  So many of us are not prepared for "a rainy day".  We haven't saved up a reserve of money to help us through a tough time. And the rainy days that I am talking about are not zombie apocalypses.  The fridge, washer, dryer, car, house, they all seem to have a problem, and at the most inconvenient time!  Kids need money for school, soccer, football, tennis, new shoes, birthday presents for friends, doctor/hospital visits.  The list could go on forever.  A serious illness or extended hospital stay can devastate a family financially. Having money set aside for these events will give you peace of mind because you won't go into financial ruin to pay for them.

I know it's difficult to just get by every month, but lets look at a few ways to start saving money:


  • Pay yourself first every month.  No matter how little it may be, take out money for yourself and put it in a savings account.  It may seem difficult at first, but it will become habit.  
  • Don't use credit cards, unless you pay them off every month.  
  • Don't try to get out of debt while still going into debt.  You can't get out it if you are still buying the latest and greatest thing.  Hold off on those impulse purchases!
  • Save a few dollars every month and put it in your 72-hour kits.  If you only have large bills, a bottle of water may cost you $20 in an emergency when there isn't any electricity for credit/debit cards.
  •  Live within your means.  Don't watch your friends and neighbors and try to keep up.  This one is really hard, but you have to remember the long-term goal of having money set aside.  And most of those people with fun toys are probably in debt to pay for them.  Don't get caught up in the hype!
  • Having food storage will always pay off in a situation where  money is tight.  Cutting the food budget is the first thing you can do.  If you have food storage you can do that!  Learn to cook from scratch and always have basic food ingredients on hand. 
  • Discipline! You have to exercise control when spending!
  • Make and stick to a budget.  Writing things down makes a huge difference rather than thinking you know how much you spent.  There are a TON of apps you can have on a phone or tablet to keep track of your budget.  I find it really convenient and it's so easy to pull up and look at what I have spent.
  • Speaking of phones....is it a necessity?  Think about a cheaper phone, or phone plan.  Do all of your children need a phone?  This goes for tv's, satellite plans, insurance plans, there always seems to be a better deal, and switching companies can save you money.  There are also so many ways to watch tv and movies, whether it's online, or renting, there are ways to cut back the costs. 
  • Wants vs. Needs....be realistic on what your wants are.
  • Become financially independent over time, gradually.  Just as with food storage, this is a process and not a one time event.  Be patient with yourself and save a little at a time.  It will add up.

These are just a few ideas of what you can do to save money for a rainy day fund.  It takes time and patience to accomplish. Get your whole family involved in saving money.  Teach your children about money, working, and budgets.  Keeping the communication open about money will alleviate the stress level for children.  They know when we are stressed, talking about it will help them feel safe.  It is really difficult, and expensive,  to raise children, but communicating with your children will teach them valuable life lessons when it comes to money and hard work.  Dealing with money is HARD, and we ALL stress about it, but make saving money a goal and commit to that goal.  Be ready for that rainy day!

Here is a link to view the pamphlet from the LDS church on having a financial reserve.

Tuesday, June 17, 2014

Prepare Today Homemade: Homemade Honey Bunches of Oats Cereal

Print Friendly and PDFPrint Friendly
As pay day comes closer, out pantry gets smaller.  And my children claim that there isn't anything to eat in the whole house.  Translated...they don't want to make anything in the house.  One of the items that are dwindling in our pantry is cold cereal.  It's not the healthiest, but it's quick and my kids like it.  For a June day, it was only 40° outside, so I decided it was a good day to heat up the kitchen with some baking.  


Clear back when I started this blog, I remembered a recipe for Honey Bunches of Oats cereal that I posted.  Could I find it anywhere on this blog?!?!  I figured it I couldn't find it then you probably couldn't either.  I went through almost every post I wrote during my first year of publishing this blog, and I found it!  It turned out to be one of the easiest recipes I've made in awhile and tasted good too!


Boil the sugars and mix in with the oat/cereal mixture.


Homemade Honey Bunches of Oats

10 C. quick oats
1 18oz. box of corn flakes cereal 
1 C. of honey or corn syrup (I used honey)
1 C. brown sugar
1/4 C. water

1. Preheat oven to 300°.  Stir together the quick oats and the cereal in a large bowl.

2. In a small saucepan combine the honey, brown sugar, and water.  Bring to a boil and stir until sugars are dissolved.  

3. Pour sugar mixture over the oats and stir until combined.  Spread onto a greased cookie sheet.  Keeping the thickness to about 1/2".

4. Bake at 300° for 30 minutes.  (I felt it needed a minute or two longer so I stirred it before cooking 5 minutes longer)

5. Let sit until cooled and store in an airtight container. Will last 2-3 months if tightly sealed. 


It tasted just sweet enough and had a good crunch to it.  My kids are so excited to try it for breakfast tomorrow.  

Update:  This batch lasted only a few days. It was really good!  Every single one of my kids ate it!  All 5 of them!  This is definitely a keeper!!

Wednesday, March 19, 2014

Bread Crumbs, Green Onions, and Parmesan Cheese Lids

Print Friendly and PDFPrint Friendly
I'm still here....still prepping.....but life is crazy and I haven't had the time to blog in a long time! 

This will be a quick post of something that I found on pinterest (because who comes up with any idea on their own anymore) and have been using, and I wanted to share it with all of you.

I'm sure all of you recognize this green lid.  It's from a Parmesan cheese container.  BUT it also fits onto the regular mouth mason jars.  I have been keeping these lids "just in case" I might need them, and guess what???  I found a couple of great uses for them.  On a side note....the lids from the name brand cheese containers, like Kraft, fit a little better then the generic brand containers that I also had.  

A little blurry when taken out of the freezer :)
 
I didn't know what I would use these shaker top lids for, but the other day I was shaking my frozen bread crumbs out of a baggie and a light bulb went off in my head!  If I transferred my bread crumbs to a mason jar and added the shaker-type lid, I could just pour out the amount of bread crumbs without messing with a plastic bag!  I was kind of excited! (doesn't take much)

Then, also in my freezer, I noticed my cut green onions that I had been storing in a plastic water bottle.  That was also something I found on pinterest, but trying to get cut green onions into a small water bottle was WAY more trouble then it was worth.  But again, the mason jar and shaker lid were perfect!!  I snipped my green onions into the mason jar, tightened the lid, and store it in my freezer for use in many recipes.  

I have loved the convenience of both these ideas!  It also helps keep my freezer more organized because I can see the jars much more easily then a bunch of plastic baggies all bunched together.  

And don't forget THIS TIP about re-growing your green onions.

After I snipped all my onions into their freezer jar, I put the roots into a jar on the window sill.  This is about 5 days worth of growth. The grow quickly and you can snip off what you need and they will continue to grow!!  Cool, huh?!?!?

I still encourage all of you to continue with your food storage, everyday,  even if it's something small like a Parmesan cheese lid :)

Tuesday, May 14, 2013

"Soup In A Bag" Review

Print Friendly and PDFPrint Friendly
One of the benefits of having a blog is meeting new friends over the internet in the blogoshpere.  Megan, from My Food Storage Cookbook, is one of my food storage blog friends.  The reason her website caught my eye was her amazing food storage recipe organization.  Her recipes are organized into several catagories, cross referenced, color coded, so at any given time she knows what recipes her family eats and what she needs to shop for. If there was an emergency and she had no power, Megan can look at her recipe book and can see exactly which recipes are for a Wonder Box, or cook top, etc. It really is a great system for rotating and using your food storage!!  Plus, she shows you how to make your own recipe book with instructions and videos!  She is also truly inspired when it comes to finding new ways to prepare and cook every day food by using your food storage and shelf stable ingredients.  I have learned so much from her website. Take a look at My Food Storage Cookbook and you'll see why I was so impressed with her organization and recipes. 


Megan had a giveaway for the book "Soup In A Bag" and I was lucky enough to win a copy in return for reviewing a few recipes from the book. The concept of "Soup In A Bag" is a cookbook collection of soup recipes that use all dehydrated and shelf stable ingredients that can be stored together, in a bag or jar, to have on hand for food storage emergencies, busy nights, etc.  I selected a few recipes, spent one day dehydrating ingredients for the different soups, another afternoon making up the recipes and sealing the soups in mason jars using my Foodsaver. I made four different soups from the book and my family let me know which one was their favorite one.  

Check out my review HERE and watch Megan's website for reviews from the other giveaway winners all week.   

Tuesday, April 16, 2013

Using My Food Storage: Soup In A Bag (Jar)

Print Friendly and PDFPrint Friendly
Today I ended up with several uninterrupted hours and I found the perfect project to tackle. I recently won a giveaway on Megan's blog, Myfoodstoragecookbook.com, and I received the book Soup In A Bag.  I needed to review a few of the soups and in my few uninterrupted hours I made several jars filled with dehydrated and freeze-dried foods.  When I reconstitute them I will have almost instant soups.  I made them in an assembly line type of process and it really helped that I could get out all of the ingredients, make the jarred meals, seal them, and get them put away, without children interruptions.  I love to look at the jars all finished and ready for a busy night when I can pull out a jar, heat up some water and have dinner ready in minutes. 
 
 One of the recipes called for dehydrated rice and tomatoes and I needed to dehydrate them before I could make jarred soup mix with them, but I had all the other ingredients to make Carrot Yam and Potato Cheese soup mix.  I sealed the jars with my foodsaver and they are good on the shelf for at least a year.  

This is a great book if you want to make your own Soups In A Bag or jar.  The author uses mylar bags and jars to preserve her soups, but you can choose which way works best for you. Find the book HERE


Friday, April 12, 2013

Using My Food Storage: Making Mixes

Print Friendly and PDFPrint Friendly
My goal when grocery shopping is to stock up when an item is at its lowest price point.  This way I am getting the most bang for my buck.  I usually can keep my pantry stocked using this method but lately I haven't been able to find brownie mixes for under $1.00.  I  know it isn't that difficult to make brownies from scratch, but my children usually want them after dinner and I don't want to mess up the kitchen again getting all the baking ingredients out.  So my goal for today was to mix up a big batch of brownie mix and only make the big mess one time.  Now we have a container of brownie mix that will make at least 7 batches of 8x8 size pans.  

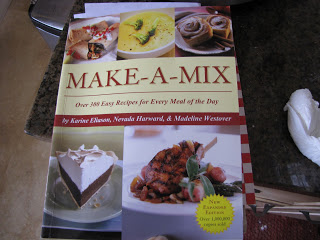
I am not a huge user of  homemade mixes, but there are a few that make my life a little easier.  I use the book "Make-A-Mix" for most of my recipes and mixes. The brownie mix has always sounded so good, and....
...the brownie mix can be used for more than brownies too!!!  How about chocolate chewy cookies, Texas sheet cake or Brownie Alaska. These all sound so good, can you tell I really love dessert!!!  (Click HERE to view a previous post I wrote on making mixes.)

The original recipe calls for melted butter and eggs when you mix up the brownies, but I food storagized the recipe and used powdered butter and powdered eggs.  If I was a math whiz I would've figured out how much to add to the dry mix, but I freely admit math isn't one of my talents, so I just added it in when we mixed up the batch of brownies.   It worked great and the brownies cooked up fluffy and looked just as brownies should.  Although as I type this I remembered that I totally forgot to add the vanilla in.  I had "help" making this (my 5 year old was mixing) so I can blame it on that :)


My other new find that I am using all the time is chalkboard contact paper.  This may be too crafty for some of you but stay with me.  I bought the chalkboard contact paper, chalk paint pen, and a cute punch out stamp on amazon.com and I have been labeling everything.  It started with my flour and sugar canisters and now I am labeling my food storage containers.  What is so wonderful about the contact paper is it is removable and the chalk pen ink is erasable!!!!  

 All the items in the picture (not the container) were purchased on Amazon, but I assume craft stores would carry these supplies as well.  When the brownie mix is all gone I may want to fill the container with corn meal, and all I have to do is rub the chalk ink with a damp paper towel and rewrite the label.  I am in love with this stuff!  I even made labels for my dehydrated food...
My dehydrated food jars will always be changing depending on what I am dehydrating and the labels are so easy to change.  Plus I can peel off the contact paper label so easily if I need to water bath or pressure can with these jars.  Maybe I am a little to excited but this has been so fun to do!  And I am not usually a crafty person, but I like to be really organized and this system really makes the pantry look put together. 

Here are our brownies made from a mix using butter and egg powder.  They are definitely more of a cake-like brownie, but we did add chocolate chips to our batch and that helped to make them more fudge-like.  (and I had no idea how to reconstitute the butter powder.  I probably did it wrong and so the brownies aren't that fudgy )And I don't know if it is me or the butter powder but I can totally taste it, even when it is cooked.  I have heard great things about Thrive's butter powder so I may look into trying that brand.  For the next batch I will make them with real melted butter and see if I can taste the difference. And as I was putting this in the oven I mentally smacked myself because I could've made this in the sun oven today, it was so sunny outside.  Next time....

I'm sorry that there is no mix recipe in this post, but I highly recommend buying the Make-A-Mix book for all of the recipes in it. I just wanted to give you all an example of what I do daily to use my food storage.  This may inspire you to do something today with your storage!!  If you would like a brownie mix recipe, I found this one on pinterest and it seems to be really popular.  CLICK HERE  to view it. 
Related Posts Plugin for WordPress, Blogger...