Saturday, March 24, 2012

A Safer Emergency Candle

Print Friendly and PDFPrint Friendly
It doesn't take much to excite me (especially when it comes preparedness items) and when I saw this new emergency candle I knew I had to have one.  I am all for having an emergency plan, but you need to have a backup plan and a backup plan to your backup plan.  I like to have options for my emergency preparedness and when it comes to lighting I feel you need to have several different ways to light your home, tent, car, or wherever you may be bugging out.  

Meet the newest member of the lighting family, the Safer Emergency Candle
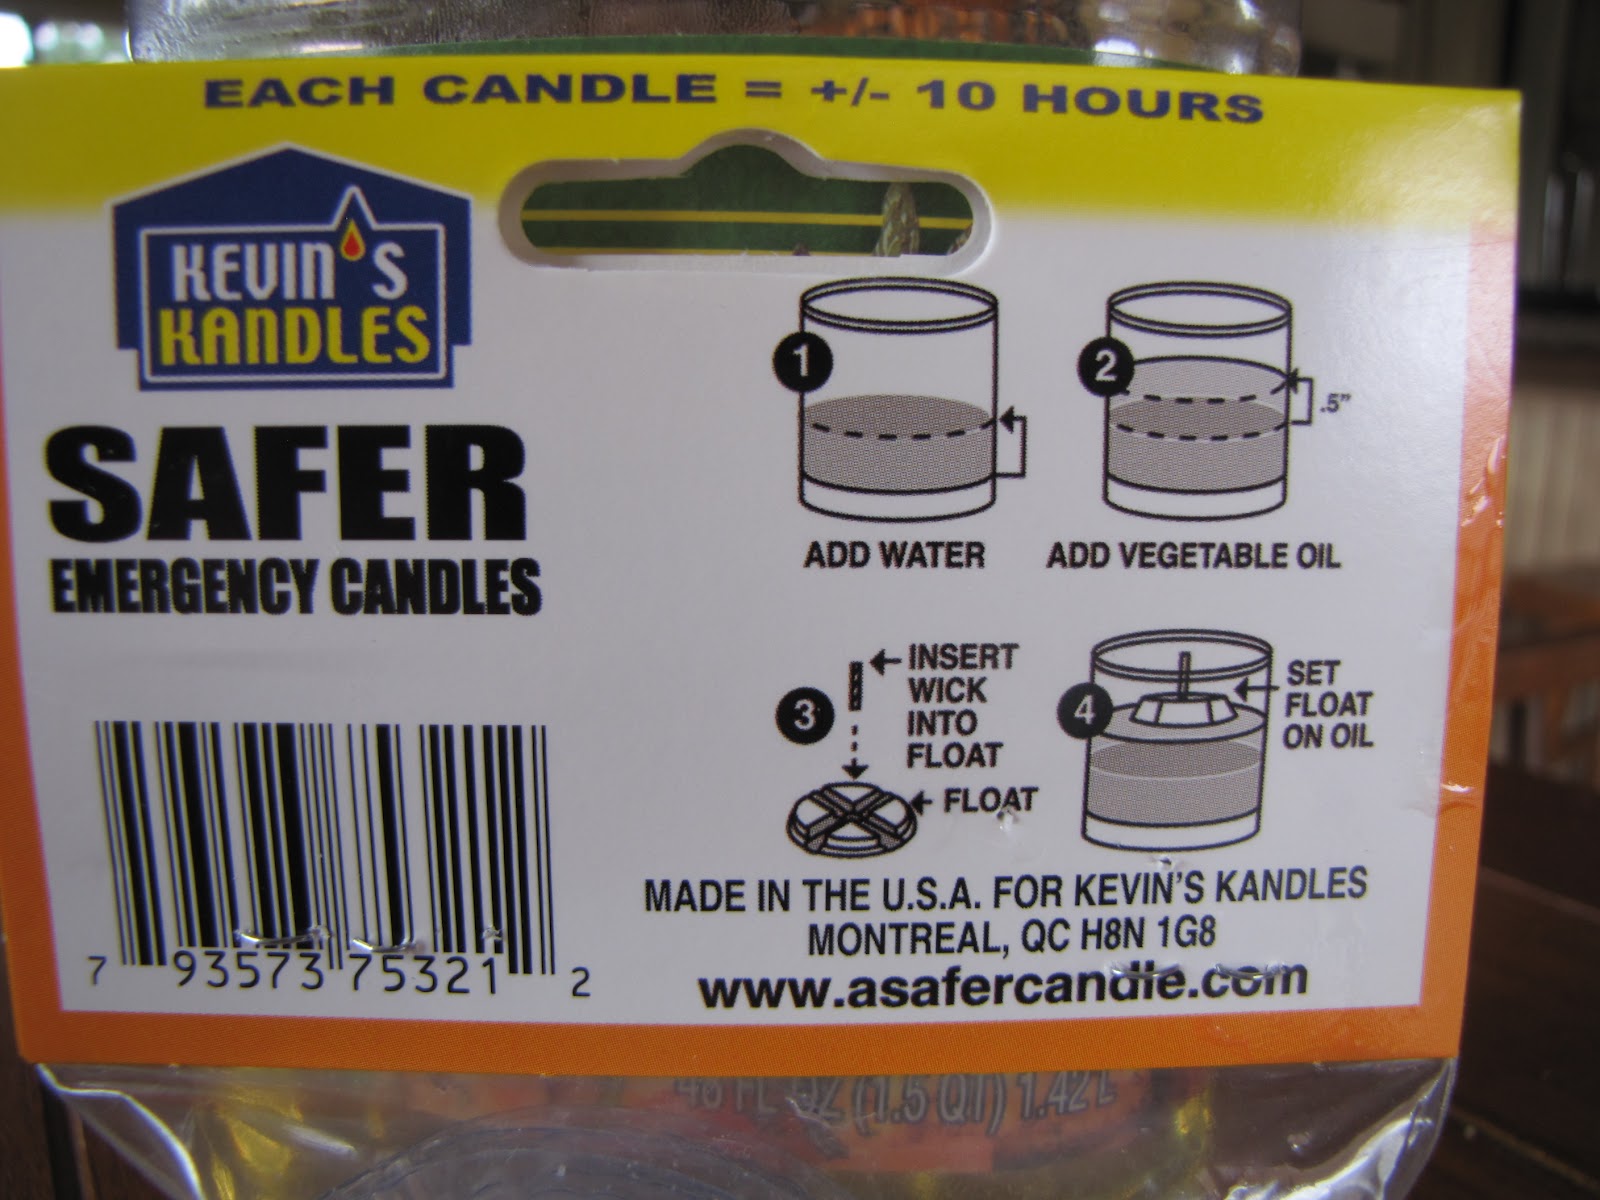
 The Safer Emergency Candle is a great way to have a compact, lightweight light source. A major selling point to me is that if the candle gets tipped over is puts itself out.  Each packet comes with 5 float cups, 100 wicks  (candle wick burns +/- 10 hours).

The instructions are quite simple....

Fill a small glass half-way with water.
Add no more than 1/2" of oil.  I used Canola oil.
Place the wick into the plastic cup.
Add the plastic float cup into the glass.
And light!! 
 If the glass gets tipped, the water will put out the flame.  I have 5 children and in an emergency I would feel at peace knowing my kids wouldn't be burning our home down. I would not leave the candle unattended but it is an added safety feature. 

The Safer Candle is also very cost effective.  This is from the Safer Candle website:

Convenient and far less expensive:

A package of Kevin’s Kandles costing MSRP less than $ 9.USD and contains sufficient supplies to create 100 candles. Factoring in the average cost of vegetable oil in North America will provide the consumer with 100 - 10 hour candles for less than 20¢ per candle. There is no other candle on the market at this low price. It is conceivable that you, as a consumer would only require one package in your lifetime. If the consumer decides to use these candles instead of traditional candles in a non-power failure situation as a means to improve their safety – so much the better.

I'm sold!  I thought these little packets of wicks and float cups were such a great idea.  I have lanterns, candles, flashlights, and now a Safer Candle pack.  Check out the Safer Candle website to order.

I even tested the brightness of the candle.  Don't mind my kids' bathroom (please) but is the only room without a window and I did this test during the day. I could see this working really well with 2 or 3 on my kitchen table and we could have enough light for meals.  So, if you would like another option for your lighting storage this may be the way to go.  I lit the candle just before dinner and it has been burning for over an hour and I haven't noticed any difference in the size of the flame.


Honeyville in Salt Lake was kind enough to let me have this packet of Safer Candles to try out. 

Monday, March 19, 2012

Prepare Today Homemade- Muffin Mix

Print Friendly and PDFPrint Friendly
A great way to save time and money when making meals is to use mixes.  If you purchase ingredients in bulk and use them to cook your meals you are saving money.  If you make mixes with your bulk ingredients you are saving time.  I use mixes for pancakes, waffles, white cream sauce, cakes, and now muffins.  

I like to make muffins with my dinners because I can sneak in whole wheat flour, ground flax seed, chia, fruits, and even pureed or dehydrated veggies.  Plus I know my kids will eat at least the muffin for dinner.  Our dinner rule is you get what you get and you don't throw a fit.  They get to eat what I make for dinner, nothing else. They have to try at least one bite of everything.  They usually always will eat a muffin, or two.  

This is the old cover, it has since been revamped.


I found a cookbook from 1978 called "Make-A-Mix Cookery" and have really liked the recipes in it.  My family really loves the pancake mix from this book.  They cook up so fluffy and thick.  So I thought I would try the muffin mix and it turned out pretty good.  I still need to tweak it with filler ingredients but it is a good base for adding on.  

Shortening powder is the way to go with mixes!!
Freeze-dried fruits are perfect for muffins!!
 Muffin Mix
8 C flour (I need to experiment more with whole wheat)
2/3 C sugar
1/3 C baking powder
1 T salt
1 C shortening powder

In a large bowl combine the ingredients and mix well.  I use a whisk to get it all mixed up.  Makes about 10 cups of mix.  I keep mine in a #10 can in the fridge because of the shortening powder and it should last at least 12 weeks. (see comments below if you want to add powdered milk and egg to your mix)


Use the mix to make many kinds of muffins.  I made the Melt-In-Your-Mouth Muffins from the cookbook. 


2 1/3 C muffin mix above
1 C milk (1 C water + 3 T powdered milk)
1 egg (1 T powdered eggs + 2 T water)
Combine the above ingredients and stir.  Add in 1/2-1 C dried or fresh fruit.  Fill muffin pans 2/3 full and bake in 400 degrees oven for 15-20 minutes or until golden brown. 

"Muffins" in my thermal cooker using the muffin mix.


The possibilities are endless with what you could add to these muffins.  Apples, bananas, cheese, apricots, pineapple, jelly, etc.  I used this mix to make muffins in my Saratoga Jacks thermal cooker. Click here to see that post.

Saturday, March 17, 2012

Muffins In A Thermal Cooker

Print Friendly and PDFPrint Friendly
I try really hard to make preparing a lifestyle.  I usually find something to do everyday that relates to preparing.  Some days it is a big project, like cooking outdoors, or sometimes something small like picking up a few items at the store.  Either way I like to always try new things and find what works for my family.  I have been using my Sartatoga Jacks thermal cooker and have been experimenting with new recipes.  One of my goals is to be able to make bread in the thermal cooker, and it is definitely a trial and error kind of project.  


One of my favorite food storage websites is myfoodstoragecookbook.com and it is where I find inspiration for cooking with a thermal cooker.  Megan is the author and she uses a wonder box to cook in (click here to view more on a wonderbox) and it is the same concept as the Saratoga Jacks thermal cooker.  I have been trying to cook bread in my thermal cooker for awhile now and Megan has, what I think is, divine inspiration because she finds the coolest gadgets to use in her wonder box for making bread. She made muffins using Dredger Cups from Sur La Table instead of soup cans. (that I had been using which are ok, but they get rusty really easy)  A Dredger Cup, I think, is used for shaking powdered sugar, etc onto food.  I just went with it, and I'm still not sure what is really is :)  Click HERE to see more info on Dredger Cups. What makes these so amazing is they are stainless steel, reusable, rust-free, and fit so well into the thermal cooker.  
They are only about 3 1/4" high, so pretty small, but I could fit 5 into the thermal cooker.  
The lids of the Dredger Cups are a wire mesh so I put tin foil on top of the lids to keep the moisture out.  They are just tall enough that the small thermal cooker pan fits right on top to fill in the dead air space.  Thermal cooking only works well when the pan is full of warm food or water.
I mixed up a batch of blueberry muffins (click here for that recipe) and I have a secret that will make your muffins come out cooked and not mushy.  When thermal cooking, the moisture isn't released from the food because it is all enclosed, and sometimes the food comes out mushy.  The secret is to use less water in your recipe.  In this recipe I used powdered shortening and powdered eggs.  Normally I would add water to my recipe to reconstitute these, but I only added the 1 C of milk called for in the muffin recipe and no water for the shortening and eggs.  The dough was really thick and I wasn't sure it was going to work but it did!!  Every time I have tried wheat bread in my thermal cooker it has come out slightly mushy, so I was so excited to see the muffins come out fully cooked sans the mush!!  You'll have to play around with your recipes but I think 1/4-1/3 C less water should work.
I sprayed the inside of the cups with cooking spray and filled them about 2/3rd's of the way full.  I placed the wire mesh lids on and then covered them with foil.
Place the cups into the pan and fill with warm water to about the bottom of the Dredger Cup lid.  Bring to a boil for 10 minutes!!  This gets the food warm enough to cook the muffins.  Place the lid on the pan while it's boiling so it gets warm too.  My lid went on after the picture was taken.  I stacked my thermal cooker pans (the smaller pan was filled with boiling water) placed them in the thermal cooker and "cooked" the muffins for 3-4 hours.
I opened mine up at the 3 hour mark because my dinner was ready and they were perfect!!!  You may be wondering how I got muffins out of a bunch of cylinders but watch....
They come out in a loaf and....

You slice them into "muffins"!!!  I cut each loaf into 4 "muffins" and my kids gobbled them up with butter and jelly.  I was really was so excited that this worked!  I can't wait to try wheat bread again using the less water method. This same method works in a Wonder Box as well.  My trial and error with using a thermal cooker just keeps proving to myself that NOW is the time for trial and error.  Even in an emergency I don't think my family would eat soggy, mushy bread and muffins, but I have figured out what works now.  Don't wait any longer!!!  Find a food storage project that you have been putting off and try it today!!!

Monday, March 12, 2012

Prepare Today Homemade-Chicken Cashew Pasta Salad

Print Friendly and PDFPrint Friendly
This is one of those go-to recipes when I don't know what to make for dinner.  It is easy to make and it's one of my children's favorite meals.  It is a perfect summer salad because you don't have to heat up your kitchen. 


 Chicken Cashew Pasta Salad

12 oz small macaroni
2 chicken breasts, cubed (we also love this with 1 can of tuna)
2 C halved red grapes (or freeze-dried grapes)
2/3 C chopped green onion (great way to use the ones growing on your windowsill
2 C chopped apple (dehydrated apple works too, just toss in, no need to rehydrate)
1 C mayo
1/2 C coleslaw dressing
1/4 C milk
salt & pepper to taste
1 C cashews


Cook the pasta according to package directions and rinse with cold water.  Mix the chicken, grapes, apple, and green onion in a bowl, add the cooled pasta.  Stir together the mayo, coleslaw dressing (I actually just use a little bit more mayo and about a T of sugar instead of the coleslaw dressing) Pour dressing over the pasta mixture and stir until combined.  Cover and chill before serving.  Add the cashews just before serving.  (keep nuts in a mason jar and seal with a foodsaver to keep them from going rancid.  The freezer works as well)


Ok, this picture is totally gross!  A blob of fat laden mayo on top of pasta...BUT.....

...Have you tried this mayo yet??  It is made with olive oil and it only has 3g of fat per serving.  I feel so much better serving this to my family than regular old mayo. 

Sunday, March 11, 2012

Through His Servants....

Print Friendly and PDFPrint Friendly
Through his servants, the Lord teaches us the pathway to happiness and safety.


I know of nothing of great importance that has happened in the world that the Lord through his prophets has not advised the people of beforehand, so that they have not been left in ignorance of what was to develop, but could plan their lives, if they would, to their advantage...


The case of Noah is in point.  He was commanded of the Lord to build an ark in which the righteous might be preserved from the flood which was to come.  Noah built the ark and preached repentance to his generation for a period of one hundred and twenty years, thus fully warning them. The people, however, were so wicked that they failed to heed the warning.  Having their agency, they chose evil rather than righteousness.  The rains descended, and the floods came, and only Noah and his family of eight souls were saved.  All had been fully warned, but because of their wilfulness and their refusal to repent they were drowned.  {see Moses 8:13-30}


-Teachings of the President of the Church:  George Albert Smith pg.60

Monday, March 5, 2012

Prepare Today Homemade- Quinoa Fried "Rice"

Print Friendly and PDFPrint Friendly
I have found a great new way to eat quinoa.  I had some leftover quinoa from dinner the other night and I needed to make fried rice to go with our Lo Mein and remembered I had the quinoa in the fridge.  I substituted it straight across for the rice and it was really good!  It was even better the next day for lunch.  The flavors had really blended and it was delicious.  I don't really follow exact measurements for this recipe, so feel free mix it up.  If I can't mess up a recipe then you will all be fine :)


Quinoa Fried "Rice"
3 eggs scrambled
2 carrots chopped
1/2 white onion, chopped (I used 2 T dehydrated onion)
1/4 C butter
2 garlic cloves
2 C quinoa (or rice) cooked
Soy sauce to taste

Saute the carrot and onion in a skillet with a little oil for a few minutes. Add the quinoa and scrambled eggs and stir gently.  Add the butter and garlic and stir until butter is melted.  Add soy sauce and stir.  If it seems too dry you could add a little broth.  I added about 1/4 C of broth when I added the quinoa.  Once it is all combined and heated through, it is done!

I actually like this better than the black bean and quinoa salad that I made before.  It went really well with the chicken Lo Mein that we had for dinner and even my picky husband said it was good.  For him to say it was good means it really was good :)  Usually I get an "it's ok", so "it's good" was high praise.

Saturday, March 3, 2012

Shelf Stable Cheese

Print Friendly and PDFPrint Friendly
Last week I did a post on how to store cottage cheese, sour cream, and yogurt for much longer than the expiration date tells you. Click HERE to view that post.  
My Tillamook cheese in my storage room.


I also promised I would write a post about keeping cheese on your pantry shelf.  I learned this trick in a food storage class at Honeyville Grain last July, in the same class that I learned about the cottage cheese.  
In July my grocery store had these Tillamook cheese blocks on sale for $2.99  (with a $1.00 coupon) and I bought about 10 of them.  I was too chicken to set them all on the pantry shelf, so I started with only this one block.  You'll see in the first picture that I kept the cheese in an old baby wipes box.  I did this to keep any unwanted guests from partaking of my cheese.  (I have never, nor do I now have any kind of bug or rodent in my storage room, knock on wood)  I have read on other blogs that around 7 months the cheese gets very sharp so I thought that 8 months would be a good time to try my cheese out.  
The cheese was still a hard block of cheese and there was a little bit of liquid in the plastic.  It smelled kind of sharp but looked and felt just like a regular block of cheese.  
 You can see the liquid that separated from the cheese in this picture.  The cheese cut just fine and would shred just as well.  I ate a bite and it was totally edible!!  It wasn't too sharp and it would make a really good grilled cheese sandwich or a great topping on top of a casserole.  I will definitely be using the cheese in my meals this week.  I was surprised that it wasn't too sharp and that it wasn't moldy :)  I am sold on keeping Tillamook cheese on my pantry shelf.  Remember that you can't do this with any other brand of cheese, it isn't packaged the right way to do this.  This is another great way to save money by purchasing an item at its lowest price and being able to store it for a long time without refrigeration.  Most cheese has a long expiration date, but this would help in a time of little or no refrigeration.  If I was smart, I would buy smaller packages of cheese so we wouldn't have to use 2lbs of cheese at one time and not have to waste all that cheese without a refrigerator.  I may be a food storage nerd, but I love trying out these food storage tricks and it is so fun to find out the results!!
Related Posts Plugin for WordPress, Blogger...