Showing posts with label recipes. Show all posts

Thursday, October 5, 2017

Prepare Today Homemade- Pumpkin Oatmeal

Print Friendly and PDFPrint Friendly
Fall is in the air!  The mornings are cooler and my children want something warm to eat for breakfast.  One of my favorite blogs to get kid friendly recipes from is called Super Healthy Kids and that is where I found a few great pumpkin recipes.  Nothing says fall like pumpkin, and with all the super food nutrients in pumpkin, I am always looking for new ways to use it. 

I made pumpkin oatmeal today and it was delicious.  I really like oatmeal but it can get monotonous eating it the same way everyday, but with oatmeal that tastes like pumpkin pie, I couldn't wait to try it!!


 This recipe couldn't be easier!  Add all ingredients go into the pan, heat until thickened, and eat!  I had all the ingredients on hand in my storage so I know we will be eating this for breakfast a lot this fall.  

 Pumpkin Oatmeal  (from blog.superhealthykids.com)
1/2 C oats (I used quick oats)
1 C milk (1 C water + 3 T non-instant powdered milk)
1/3 C pumpkin puree (canned or dehydrated pumpkin)
1/2 t pumpkin pie spice
1-2 t honey

Add all ingredients into a saucepan.  Cook over medium heat around 5 minutes or until liquid is absorbed and oatmeal is thickened.  Makes about 2 servings. 

Amy and Natalie, from Super Healthy Kids, have several other pumpkin recipes that are healthy and delicious.

High Protein Pumpkin  Pancakes

Pumpkin Pie Shakes

Pumpkin is healthy, delicious, and not just for Thanksgiving pies.  Try adding pumpkin to your breakfast and see how yummy it can be!

Wednesday, June 8, 2016

Sun Oven Fruit Cobbler

Print Friendly and PDFPrint Friendly
The kids are out of school and the craziness that has been my life over the last 9 months has slowed to a less-crazy life.  Time is on my side for a moment and I thought I would bake a little something in my Global Sun Oven. (click here to read more on the Global Sun Oven) It has been over 90 degrees where I live and that always makes me want to cook with my sun oven.  The sun oven doesn't need the summer heat to work, just the sun, but the heat makes me want to cook outside and not inside my house. (click here to see how the Sun Oven saved my Christmas dinner)


Apple cobbler sounded like a yummy treat, but this recipe is very versatile and other fruit will work as well.  Because I have to change every recipe into a food storage recipe I started off with dehydrated apples from the LDS Cannery, and boiled them in some water to speed up the rehydrating process.  

 I boiled 2 cups of dehydrated apples, 4 cups of water, a dash of lemon juice and 1/3 cup of sugar for about 5 minutes.  It was as easy as that and after draining them I poured them into a greased dark metal pan.  The dark cookware is a good option for sun oven cooking.  It keeps the heat inside the food, where as shiny metal, or glass pans, will reflect the heat outside of the oven.  

To save cleaning another bowl I melted the butter in the same pan that the apples cooked in.  The flour and brown sugar were added to the butter and honestly it was hard not to eat it straight from the pan!! 

Once the crumb topping was mixed well I sprinkled it over the apples and it was ready for the oven. 

The sun oven was preheated for about 20 minutes while I put the cobbler together and when I put the cobbler in, it had reached 375 degrees.  Cover the dish and bake for 2 or more hours. If you aren't familiar with the sun oven you will have to make sure the oven gets turned towards the sun as the day goes on.  A good way to make sure the position is correct is to check the shadows on either side of the oven.  If they are even on both sides of the oven, the oven is correctly facing the sun. I actually forgot about the cobbler cooking and it was in the oven for a little over 3 hours, but what is so great about the sun oven is that most dishes won't burn.  Food stays warm and ready to eat when you are ready!

This cobbler was delicious!!  Kind of warm on a hot day, but I loved that it was made from dehydrated apples.  I'm adding it to my food storage recipe binder. 

Fruit Cobbler
2 C fresh fruit (apples and berries work best) OR
2 C dehydrated apples
1/3 C sugar
1/2 t lemon juice
1/2 C butter
1 C flour
1 C brown sugar
cinnamon
If using dehydrated apples:  place apples plus 4 cups of water in a saucepan and bring to a boil.  Simmer for 5-10 minutes or until soft.  Remove from heat and drain.  Stir in the sugar and lemon juice.  Pour into greased baking dish. 

If using fresh fruit: mix the fruit with the sugar and lemon juice and pour into greased baking dish.

In a saucepan pan melt the butter over low heat.  Remove from heat and stir in flour and brown sugar.  Stir until well mixed.  Sprinkle over the apples in the baking dish.  Sprinkle cinnamon over the crumb topping. Cover the dish and bake in a preheated sun oven for about 2 hours. To cook in a conventional oven bake at 350 for 25-30 minutes.
 

Wednesday, May 18, 2016

Making Yogurt With Acidophilus Tablets

Print Friendly and PDFPrint Friendly
Making yogurt is a skill that will save you money and also allow you to make several other things, like cream cheese or sour cream, out of plain yogurt.  I have been making yogurt for a few years now and I have tried many different ways and have found what works and doesn't work.  I started making yogurt with regular milk from the grocery store but milk started to get expensive so I switched to using powdered milk.  For a yogurt starter I have tried regular, plain yogurt, dried starters, and even a forever starter that gets used over and over.  They all worked but my goal was to be able to make yogurt without having to use a refrigerated starter.  I do keep plain yogurt in 1/2 C measurements in the freezer, but that will still be a problem if there wasn't electricity.  My husband has always laughed at the fact that you need yogurt to make yogurt, but I think I have found a way around needing refrigeration for a starter.  One of my favorite websites is myfoodstoragecookbook.com  and that is where I learned about acidophilus three billion.


Acidophilus Three Billion is a probiotic that aids in digestion, but it is also the live cultures needed to make yogurt.  Instead of using plain yogurt with live cultures, use the acidophilus tablets instead.  (I bought mine on Amazon, but health food stores should have it too) Take note that the incubation period for the yogurt will be quite a bit longer, like 18-24 hours, before it starts to firm up.  Normally, with a plain yogurt starter, I would get the yogurt started in the morning and it would be setting up in the fridge by dinner time.  I made yogurt with the acidophilus and started incubating at 9am and I let it sit until about 10am the next day.  It wasn't bitter, like yogurt can get, it just took longer to set up.  I also made the yogurt in my Saratoga Jacks Thermal Cooker and that was a great option if I didn't have electricity.   I usually use my yogurt maker, and I'll have to try my next batch with my tablets to see if the yogurt comes out any differently.  


This is how I make yogurt.  You will notice that I don't heat up my milk and then let it cool. If you are using powdered milk you can skip that step.  If you use regular milk from the grocery store you will need to heat up your milk to 180 degrees and then let it cool to 100-110 degrees before adding your starter.  Don't let it cool to under 100 degrees or the starter won't "start".  It will stay in kind of a hibernation state.


Start by putting 3 3/4 C water and 1 C powdered milk into a blender.  Blend until combined.  Allow a few moments for the frothy milk to settle to the top.  You can scoop it off at this point and discard.  I add 1/3 C sugar and 1 T vanilla flavoring to my yogurt unless I am planning on making sour cream with it.  My children really like a little sweetness and flavor to their yogurt. I used to give them honey to mix in but the yogurt would get runny and they wouldn't eat it.  If you really don't care to use the sugar you can try a sugar substitute.  


Pill Crusher that I bought on amazon.com.


Using a pill crusher, crush 3 acidophilus tablets and add to a little of the blended milk.  Add it back to the blender and just stir to combine.  


Pour the milk into a clean, warm quart jar.  This recipe makes enough yogurt for one quart.  (I fill my mason jar with hot water while I make up the yogurt.)


There are several ways to incubate your yogurt but I decided to try my Saratoga Jacks Thermal Cooker.  If you don't have one try a small cooler or wonderbox.  Just make sure to have little or no air space around the jar.  I filled my cooker with the hottest water I could get out of my faucet, which was around 125 degrees.  Anything hotter will kill your starter.  After 8 hours I did switch out my water for hot water again.  The yogurt won't set up if it is too cool either.  Try to keep it above 110 degrees.  Don't let all of the temperature info scare you away from making yogurt.  It really isn't as hard as it may seem.  


Here is my yogurt after about 24 hours of incubation.  It is now in the fridge cooling off.  I tasted it and it was smooth, creamy, and just sweet enough.


Powdered Milk Yogurt Recipe
3 3/4 C warm tap water
1 C non-instant powdered milk (milk from the cannery)
2-4 T plain yogurt with active cultures OR 3 Acidophilus tablets, crushed
1/3 C sugar
1 T vanilla


Combine the water and powdered milk in a blender or use an emulsion blender.  Scoop off the foam.  Add the sugar and vanilla and blend.  Add the starter to a little of the milk from the blender and stir to combine, then add back to blended milk.  Use a spoon and stir gently to combine.  Pour into a warmed quart mason jar and incubate.  Wrap tightly in towels and place in a cooler or use a thermal cooker.  Fill the thermal cooker with hot tap water and place mason jar inside.  If using a yogurt starter your yogurt will be ready after about 8 hours.  Place in fridge and allow to firm up.  The thermal cooker can take up to 24 hours.  I checked it about every 8 hours.  


I filled my jars with warm water to heat them up.


Now you can have yogurt anytime, even in an emergency.  The cooling of the yogurt after incubation could be done with a cooler that has been buried under ground (with the lid open at the top) or in cold storage, but that is a whole other post :)


Click HERE to view another post on how I made yogurt in my yogurt maker and even how I made yogurt cream cheese :)

Friday, April 22, 2016

Food Storage Teacher/Mother's Day Gifts

Print Friendly and PDFPrint Friendly
One of the greatest gifts you can give anyone is the gift of preparedness!  I leave no one safe from my preparedness gift giving.   I give preparedness gifts to my friends, family, and also as wedding and baby shower gifts, instead of gifts that may be unused.  (I am not saying you aren't prepared if you get a preparedness gift from me, I just love to help everyone get prepared) I have given cookbooks, wheat, #10 cans of mixes, #10 cans of dehydrated fruits and veggies, water containers, and meals in a bag (which make great shower gifts for newlyweds and new moms).  Last year my children gave their teachers, secretaries, and principal buckets of wheat that they could keep in their storage or use to make blender wheat pancakes without a grinder.  

 I found these great little buckets at the Honeyville Grain store in Salt Lake City and I filled them with wheat.  

 On one side of the bucket I added the saying "We hope you have a sa-wheat summer".

On the other side of the bucket I added a recipe for Blender Wheat Pancakes.  The teachers LOVED them and thought they were quite unique.  This would make a great gift for your child's teacher, or even for a birthday/Mother's Day, or a gift for family, friends, or neighbor.  Maybe it will spark their interest in preparedness and get them going :)

Blender Wheat Pancakes
1 C milk (1 C water + 3 T non-instant powdered milk)
1 C wheat kernels
2 eggs
2 t baking powder
1/2 t salt
2 T oil

Place the milk and wheat in a blender and blend on high for 4-5 minutes or until smooth.  Add eggs, oil, baking powder, and salt and blend until mixed.  Don't over mix. Pour batter directly from the blender onto a hot griddle.  Cook for 1-2 minutes on each side.  

Tuesday, December 1, 2015

Baking Items in Your Food Storage & Our Favorite Hot Chocolate Recipe!

Print Friendly and PDFPrint Friendly

In November I love to stock up on baking supplies because they go on sale for Thanksgiving. This will continue throughout December so watch the grocery stores for great deals on all of the baking ingredients and spices that you use.  Once you have your food storage basics of wheat, water, beans and rice, there is not much you can do with those items without adding spices and leavening ingredients. Spices tend to sell for a great price point this time of year.  Now is a perfect time to take stock of the spices you have in your cupboard and shop for the ones you are running low on. 
As you purchase your baking items you'll need to rotate them into your pantry at home. Keep a sharpie close by and when you bring your groceries in your house mark the date and place them behind the older item in your cupboard. (remember FIFO- first in first out) That way when you do need to see the expiration date, it will be easy to see and you won't have to search for the teeny, tiny date printed on the food. 
Another way to save money on baking supplies is to be able to tell when their life span has expired. There are several ways to test leavening agents to see if they still work.
Yeast: Add a spoonful in warm water along with a pinch of sugar. It should bubble in 10 minutes. Store yeast in the freezer for indefinite storage. I haven't had yeast go bad since doing this. I use instant yeast and I just add it straight from the freezer to my recipes and it works great.
Baking Powder: Add a pinch in warm water and stir. It should bubble immediately.
Baking Soda: Add a pinch to vinegar or lemon juice and it should bubble immediately. Store baking soda for cooking as well as cleaning.
Other items to store:
  • Another baking item that I keep on hand is Cocoa powder. It has an indefinite shelf life!! 
  • During the week I want you to pay attention to the Spices that you use for cooking. Maybe even jot them down. Could you go a whole year without purchasing more? As bigger sales come upon us in the next couple of weeks look for the spices that you use and buy at least one extra. I know a lot of basic items seem palatable when sprinkled with the right spice.
  • Did you know that you can substitute Unflavored Gelatin (Knox brand) for eggs when you are baking? (1 oz of unflavored gelatin=12 t of gelatin=12 "eggs") To use it in baking use 1t of gelatin + 3 T cold water+2 T hot water=1 "egg".  I store powdered eggs in #10 cans. I love them because they are pasteurized and you can lick the batter without risking salmonella poisoning. You just add the powder egg to your dry ingredients and then the water to your liquids. I save my real eggs for boiled and scrambled dishes.
Along with colder weather and the holidays, my children LOVE hot chocolate. This is our favorite hot chocolate recipe. I whip up a big batch and store it in an airtight container. The kids know how to make it by themselves and it save a lot of money on the pre-packaged hot chocolate mixes. Plus it uses all food storage pantry items.
Hot or Cold Chocolate Mix
(from Cookin' With Food Storage by Peggy Layton)
3 1/4 C. powdered milk
1 1/2 C sugar
1 C cocoa powder
1 1/2 t salt
Mix all in a big bowl and store in an airtight container. To use stir 1/2 C mix with 1 C. boiling water. Stir to dissolve and chill if you want cold milk.

Friday, October 9, 2015

Prepare Today Homemade- Easiest Muffins EVER!

Print Friendly and PDFPrint Friendly
Self-Reliant Saturday Recipe

 We are a family that loves a good muffin.  We eat them for dinner about 3 times per week.  Muffins are pretty simple to make, but sometimes getting all the ingredients out on a busy night is just too much for me.  I do try to bake a double batch to freeze but I don't always remember to do that.  I think I have found my secret weapon to make muffins quick and SO easy!!  I thought cake mix cookies were easy to make, this recipe is even easier!

You may have heard of the 2 ingredient pumpkin cookies, which include a box of spice cake mix and a small can of pumpkin.  You mix and bake, so easy!  Well, I thought why couldn't that dough also be made into pumpkin muffins??  And guess what?  It worked and the whole family loved them!

  In the fall the grocery stores will generally have spice cake mix for a great price.  Last year I stocked up on them because we really like pumpkin cookies made out of it.  Having all the ingredients on hand added to the simplicity of this recipe. In the picture I used only half of that can of pumpkin because it is the bigger can.  The recipe only calls for a 15oz can of pumpkin. 

 Mix the cake mix, pumpkin, and a few chocolate chips and you have muffin batter!!!  And with no oil or eggs, these muffins are a low-fat option for dinner.  They do have sugar from the cake mix, but not nearly as much as when I make muffins from scratch.

Pumpkin Cake Mix Muffins {or Cookies}
1 box spice cake mix
1 15oz can pumpkin
1 C chocolate chips

Mix the cake mix and pumpkin together with a hand mixer, add the chocolate chips and divide into 12 muffin cups.  (I had extra batter and I made about 8 mini muffins too)  **Bake at 375° for 18-20 minutes.   They could also be baked in a sun oven or volcano stove in a situation without electricity.
**I live at an altitude that I need to follow the high altitude directions and my cake mix said to bake the cake mix at 375°.  If you are below 5000ft you might need to adjust the temperature to 350°.

To make cookies:  Mix as directed above and bake at 350 for 8-10 minutes.  Let cool for a few minutes on the cookie sheet, then remove to a cooling rack.

And if you need a dessert idea, we made these tonight and they were so good and again....only 2 ingredients!!!  Click here for Pumpkin Brownies!!

Wednesday, July 22, 2015

Prepare Today Homemade- Chickpea Nuggets

Print Friendly and PDFPrint Friendly
This is a recipe re-post from 2011 and it is still one of my favorite ways to use Garbanzo beans!! Enjoy!

I know that title sounds a little weird, but go with me on this one!  They are really good!  For those that don't know I am a vegetarian and I am always looking for more ways to incorporate beans into my family's diet.  This recipe made great "chicken" nuggets for my kids and a great salad topper for me.  You have to try the honey mustard dipping sauce (or as a salad dressing, yummmmmy!!), from a previous post HERE, with your nuggets!  We have been dipping everything in this sauce, from these nuggets to sweet potato fries, and as a salad dressing.  (my next experiment is to make it with yogurt to try to cut the fat out)

Chickpea Nuggets 
(from blog.superhealthykids.com)  Makes 15-18 nuggets depending on how large you make them
1 can chickpea (garbanzo beans) rinsed and drained
1/2 onion
1 t parsley
1 clove garlic
1 egg
1 t cumin
1 t salt
dash pepper
1 t lemon juice
1 t baking powder
1 C bread crumbs
1 T oil
To be honest I threw it all in a food processor and gave it a whirl until it was smooth.  (my kids won't eat chunks of onion so it had to be pretty smooth)  

There are two ways to bake these:
Stove top:  heat a small amount of oil in a frying pan.  Shape the "dough" into nuggets shapes and pan fry until golden brown on each side. We cooked them this way and loved them!

Oven method:  Bake at 375 for 15-18 minutes, turning over half way through the baking time. I would have baked them this way, but my oven isn't working right now.  :)

My older kids ate them up, but my 3yo (being totally truthful here) gagged on them :D  She does not like the texture of beans and so I guess this was too much for her.  I whipped up a salad using greens from my garden, some craisins,strawberries, the honey mustard sauce, and the chickpea nuggets on top.  My kids asked for this two nights in a row for dinner!
  

Tuesday, July 14, 2015

Prepare Today Homemade- Applesauce in the Saratoga Jacks

Print Friendly and PDFPrint Friendly
This is a yummy recipe re-post from 2012....it's easy and smells sooooo good....I hope you enjoy it!

Applesauce in the Saratoga Jacks Thermal Cooker is simply delicious!  I have made it several times and my kids love it!  I also made it for a class I taught at Honeyville Grain and they loved it too!

 Cutting up the apples is the hardest part of this super easy recipe.  The spices and sugar slow cook with the apples and it smells like Christmas.  My kids kept thinking I was baking something for them and it was the applesauce.

 Just like all the other Saratoga Jacks recipes I boiled the apples for 2 minutes and also had the smaller pan boiling.  The apples didn't quite fill the larger pan enough, so the smaller pan used up the air space.

 After slow cooking for several hours the apples were ready to be mashed.  I wish you could smell this picture because it smelled just like the holidays.

My daughter used a potato masher and smashed the apples into applesauce.  You could also use an immersion blender.

 Applesauce
3lbs (8-9) apples, peeled, cored, and cut into 1 1/2" chunks (dehydrated or freeze dried also works!!!)
1 C apple juice or apple cider
2 T sugar, plus more to taste
pinch salt
2  (3") cinnamon sticks or 1/4 t ground cinnamon- optional but so good!  (remove sticks before mashing)

Combine all ingredients in the larger Saratoga Jacks pan.  Bring to a boil with the lid on for 2 minutes.  Also fill the smaller pan with water and bring it to a boil.  After 2 minutes place the pans together and put into the cooker base.  Cook for 2 or more hours.  When apples are soft, mash using a potato masher or immersion blender.  Add more sugar or apple juice if desired.  Serve warm, room temp or chilled.  Store in the fridge for up to 1 week.

*This recipe was originally for a slow cooker and would work just as well.

Tuesday, May 26, 2015

How To Make Ice Cream Out Of Wheat

Print Friendly and PDFPrint Friendly
Yes, the title is correct!  I made ice cream out of wheat.  It may seem impossible and maybe even a little gross (according to two of my kids it was), but it was a very interesting process.  

I came across this recipe in the "Passport To Survival" book that I found at a local thrift store. Click here to see my review of the book.

There are only four survival foods used in the recipes in this book, wheat, powdered milk, honey, and salt.  It is truly amazing what can be made out of them!  

There are a few steps to actually get ice cream out of wheat, but they are simple.  Start off by steaming your wheat.  This can be done in a crock pot, thermal cooker, wonder box, or in a double boiler.  I would've made this in my Saratoga Jacks thermal cooker, but I wanted to try this exactly as Esther Dickey's recipe said to do it.  

You will need two pots, one that fits inside the other.  You will also need some sort of metal ring, or small can, to elevate the inside pot off the bottom of the bigger pan.


I used my trivet from my Saratoga Jacks thermal cooker to raise up the blue pot.  
 Pour in enough water to come to 1" below the blue pot. 

Add 5 C of wheat kernels, 7 C of water, and 1 T salt to the inner pot.  Cover, bring to a boil, then lower heat to a simmer, and steam the wheat for 4 hours.


You will end up with 12 cups of cooked wheat berries. For a smaller recipe use 2 C of wheat, 1 3/4 C water, and 1 t salt.  That will produce about 5 C of cooked wheat berries.  

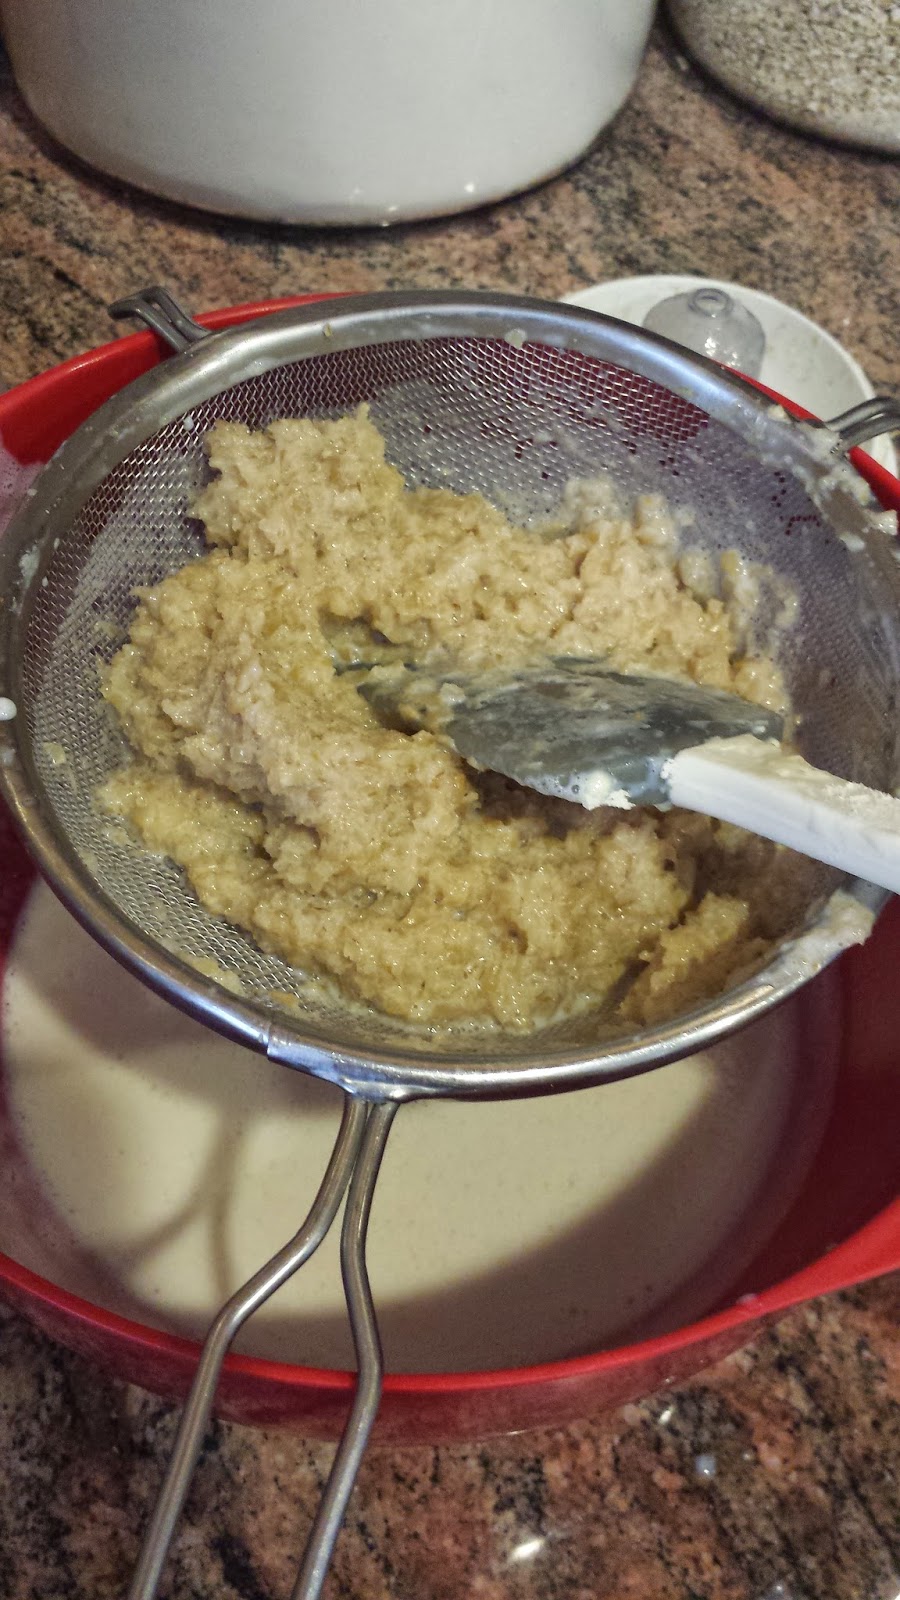
Once you have cooked wheat berries, the fun begins.  In a blender add 3 C steamed wheat berries, 3 C water, 3/4 C powdered milk, and 1/3 C honey.  Blend until mixed.  There will be bits of bran that won't blend up, but they get strained out in the next step. 

Once the mixture is blended well it needs to be strained.  The bran will be left in the strainer and the whey mixture will be used for the ice cream.  Save the bran for a recipe later.  

This is the bran left over after all the liquid has been drained off. 

Pour the liquid onto a large rimmed cookie sheet and freeze until solid. 

When you are ready to make ice cream, pull out the cookie sheet from the freezer and let it warm up for a minute or two.  I used a spatula to scrape up pieces and then used my Bosch with the cookie paddles to mix it into ice cream.  It will seem like it won't work but once the mixture softens enough it will mix into an ice cream looking substance. 

Here is my honest review.  It was pretty good.  It really tasted like a frozen yogurt.  My first two kids that tried it thought it was really ice cream and shoved a big mouthful of it in their mouths. They weren't expecting the flavor that it was and spit it out just as fast. It has a wheatie, honey flavor to it, but it was cold and creamy.  My husband and 3 other children ate it and liked it.  I have to say, that in an emergency, without all the modern foods from the grocery store, this would be a treat!  What made it even better was stirring in a bit of cocoa powder to make it chocolate ice cream.  That flavor disappeared!  Chocolate makes everything better :)

Wheat Ice Cream
3 C steamed wheat
3 C water
3/4 C powdered milk
1/3 C honey
Mix in blender until smooth.  Strain out the bran and save in a separate bowl.  Pour the liquid onto a rimmed cookie sheet and freeze until solid.  Let thaw a few minutes before mixing with cookie paddles or beaters to make it creamy and smooth. Makes about 1 1/2 C ice cream.  Optional:  Add cocoa powder for a chocolate flavor!

Wheat is amazing!  Here's what I made out of the original 12 cups of steamed wheat.....
  1. I used 6 cups of wheat berries in a double recipe of the ice cream.
  2. The left-over bran was used to make wheat crackers, recipe from the same book. (1 3/4 C bran & about 2 C wheat flour, 1 C water, 1/2 t salt.  Roll out thin, cut, sprinkle with ground up baked wheat kernels and bake at 375 for 15 min.  I just kept adding flour until the bran was able to be rolled out into a dough.) 
  3. I broiled, then slowly baked a few cups of steamed wheat into crunchy snack kernels. I ground up a handful to use as a topping on the wheat crackers, and we snacked on the rest. (Broil cooked wheat berries for 10 min or until they start popping, then bake at 250 for 30 min, or until lightly browned.)
  4. I made 24 bran muffins out of 3 C of the bran leftover from the ice cream.  (I used this recipe:  bran muffins
  5. The last of the wheat berries were made into a salad for dinner that night.  click here for that recipe 


Out of 12 cups of cooked wheat I made a dessert, 2 snacks, breakfast muffins, and a dinner.  The bran is in the green bowl above in the picture.  There was quite a bit left-over after making the ice cream and it went a long way in making A LOT of crackers and 24 bran muffins.  Wheat really is the staff of life!!  The whole book "Passport to Survival" is filled with recipes that start off as one recipe and then lead into several other ways to prepare it. Wheat is so versatile and truly is a survival food!!

Wednesday, April 29, 2015

Baked Cheesecake in the Thermal Cooker

Print Friendly and PDFPrint Friendly
You're going to think I am obsessed with cheesecake but I came across a recipe for cheesecake in a slow cooker and I wanted to try it out in my Saratoga Jacks Thermal Cooker ( Click HERE to see what a thermal cooker is.) using the smaller cake pan insert for the cooker.  I haven't had the best of luck baking cake in the cake pan so I was hoping this cheesecake recipe would break my losing streak.  

All good cheesecakes start off with a graham cracker crust.  I used homemade graham crackers from this recipe HERE.  Melt 3 T butter and mix with the graham cracker crumbs.  I mushed it all together in the bag...less mess...easy clean up.


Three ingredients...that's it...three!  That's all this recipe needs. 

Mix the cream cheese, sugar, and eggs, pour over the crust and it's all ready for the boiling stage. 

 The thermal cooker is all about the hard boil.  Bring the food to a hard boil, place in the thermal base, and it will slow "cook" for hours.  
  1. Fill the larger pot with water to about 1 cm above the trivet (it comes with the cake pan).
  2. Place the covered cake pan on top of the trivet and bring the water to a hard boil.
  3. Lower the heat but keep the water boiling and boil for 20 minutes. 
  4. Place the pot into the thermal base.
The directions I used were given to me by Amy from Saratoga Jackes for baking a cake in the thermal cooker, but I felt a cheesecake was close enough to a cake and needed similar instructions.  If that rings true the cheesecake should've been done in about an hour and a half, and I put the cake pan in the cooker at 9:30 am. What is really cool is that I wasn't home all day and the cheesecake didn't get taken out until 4:40 pm and it was not overcooked.  The thermal cooker will keep your food warm and ready to eat, even when the "done" time was hours before. 

  This cheesecake was DELICIOUS!!!  It was creamy and had just enough sweetness!  My husband and kids loved it!  It's a keeper!!

Thermal Cooker Cheesecake
3 packages cream cheese, softened (I used low-fat)
3/4 C white sugar
3 Eggs
6 graham crackers, crushed
3 T melted butter

Mix the graham cracker crumbs and melted butter and press into the bottom of a greased Saratoga Jacks cake pan.  Blend the cream cheese and sugar in a bowl using a hand mixer.  Mix in each egg one at a time, blending well after each egg.  Pour mixture over graham cracker crust. Place the cover on the cake pan and lock.  Put the cake pan into the larger cooking pot with the trivet in place and water filled to just 1 cm above the trivet.  Cover the cooking pot and bring to a boil.  Keep boiling for 20 minutes.  Remove pot from heat and place in thermal cooker base and close the lid.  Let sit for at least 1 1/2 hours or up to 8 hours.  Remove the cheesecake from the large cooking pot and let cool on the counter for 30-60 minutes.  Then cool for several hours in the fridge.  Slice and serve with fruit toppings. 

My next challenge will be making this with shelf stable cream cheese powder, butter, and eggs :)

For the slow cooker recipe click HERE

Thursday, February 19, 2015

Prepare Today Homemade-- Shelf Stable Cheesecake Recipe

Print Friendly and PDFPrint Friendly
My cheesecake drama, you can read about here, actually turned into an experiment on how to use cream cheese powder.  I purchased a #10 can of cream cheese powder from Honeyville Grain and then attempted to make a no-bake cheesecake out of it.  Attempted because there aren't a lot of instructions on the side of the can to know how to reconstitute it! I asked a friend of mine to help me with measurements and she said 1 1/2 Cups of powdered cream cheese will equal 1 8oz. block of cream cheese.  Adding water to get the right consistency is what took a little experimenting.  I only used about a 1/2 cup of water to get a cream cheese texture that I could mix easily with a hand mixer.  So watch the water amounts when you are making this, you can always add more.

 Shelf stable whipping cream made by Gossner's is one of my favorite items to have in my food storage.  It can be used for whipped cream, you can make butter out of it, and it is great in soups.  I buy mine from Honeyville in Salt Lake City.  Totally worth it to have on hand!  And the cream cheese powder is now another one of my favorite shelf stable ingredients.  I picked that up at Honeyville as well.  It runs about $28 online right now.  I was not compensated for this post.  These are truly products that I have in my storage and that I use. 


As you can see from the picture I figured out this cheesecake craziness!  Much better than my first runny mess of a cheesecake attempt.  You can see that disaster in my last post, read it HERE. I was making the cheesecake for a preparedness class at church so I used a 13x9 pan to feed a crowd instead of a pie pan.  

The crust is simple, I used the same recipe from my last post HERE,  which has graham cracker crumbs, sugar, powdered butter, and then I added the water to reconsitute the powdered butter. 
I mixed it up with a fork and then used my hands to really mix it well.  Then I firmly patted it down into the 13x9 pan and let it chill in the fridge.

Now, onto the making of the filling.  I actually made two different cheesecakes so I could try out my shelf stable heavy cream in one of them.  The other recipe uses sweetened condensed milk with the cream cheese. 

No-Bake Cheesecake Using Heavy Cream


3 C powdered cream cheese (or 2 8oz packages cream cheese)
1/2 C- 1 C water (don't add the water if using real cream cheese)
2 t lemon juice
16oz (1 pint) heavy whipping cream, chilled
1/3 C sugar

Using a hand mixer blend the powdered cream cheese with a half cup of the water.  Slowly add more water until you reach a cream cheese texture.  Don't add too much water!  You don't want it runny. Mix in the lemon juice until well blended.

Add in the whipping cream and mix on medium high until stiff peaks form.  Add in the sugar and mix well.  Mixture should be slightly thick, not runny.  Pour into prepared graham cracker crust and chill at least 2 hours. 

This is the cream cheese powder mixed with a little water.  Don't let it get too thinned out or the cheesecake won't set up.  The cream cheese powder does thicken when it sits in the fridge. 


This is the mixture after adding in the lemon juice and the whipping cream. See the stiff peaks in the middle of the creamed mixture. 

The sugar gets mixed in lastly and mixed well.


Spread the mixture over the crust and chill. 


No-Bake Cheesecake With Sweetened Condensed Milk

Toothpicks held up the cover :)

Sweetened Condensed Milk
In a blender add:
1/2 C hot water
1 C non-instant powdered milk
1 C sugar
3 T melted butter (3 T butter powder+3/4 t water)
Blend until mixed well. Or substitute 1 14oz can sweetened condensed milk.

In a mixing bowl add:
3 C cream cheese powder (or 2 8oz packages cream cheese)
1/2 C-1 C water (don't add the water if using real cream cheese)
Combine the cream cheese powder and water in bowl with hand mixer, slowly add 1/2 C water until well blended, smooth, and has a cream cheese texture. Add more water as needed to achieve the right cream cheese consistency. 
Add in:
2 t lemon juice
1 t vanilla
Blend well.  Add in the sweetened condensed milk from the blender, or 1 can sweetened condensed milk.  Blend well with hand mixer.  Pour into prepared graham cracker crust and chill at least 2 hours. 

This is the cream cheese powder, lemon juice, and vanilla mixed together.  

In goes the homemade sweetened condensed milk.

Chilled and ready for serving. I needed to transport this to where I was teaching and I first put aluminum foil over the top...see where it stuck to the top of the cheesecake!  I added toothpicks to hold up the foil.  I didn't want to mess it up even more by pulling them out before taking the photo. 


The cheesecake made with the shelf stable whipping cream set up a little better and had a firmer texture.  It also cut and held up on a plate better than the sweetened condensed milk version, which was kind of sticky. I preferred the cheesecake made with whipping cream because it had a lighter texture and wasn't too sweet. But they both tasted great!  It's always smart to have options when it comes to food storage. If plan A doesn't work, you can fall back to plan B or even plan C.  I will probably use real cream cheese to make these recipes most often, but knowing I have another option, if the situation arose that I needed one, is a comforting feeling.

Related Posts Plugin for WordPress, Blogger...