Monday, April 16, 2012

Prepare Today Homemade- Minestrone Soup in the Saratoga Jacks Cooker

Print Friendly and PDFPrint Friendly
This is one of my go-to dinners when I know my night is going to be a crazy one.  I usually make this in my slow cooker but it works equally well in a thermal cooker. 
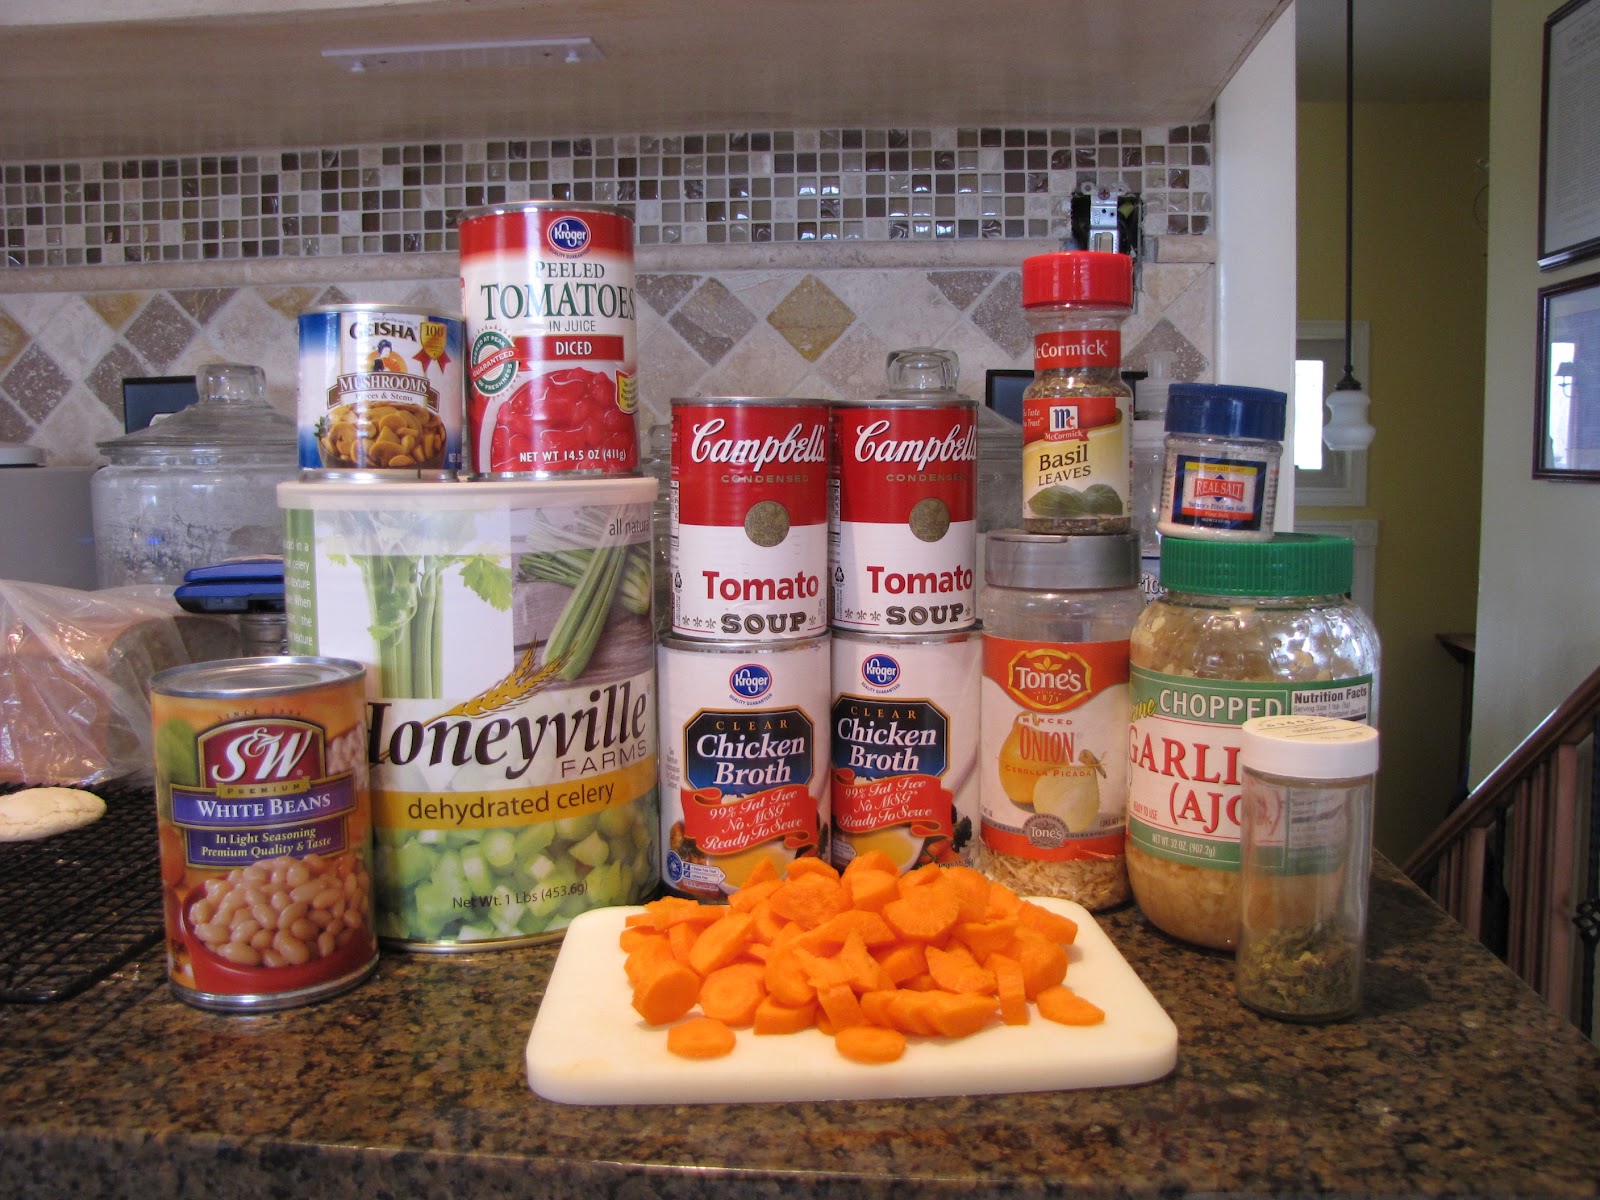
Minestrone soup is great for a shelf-stable recipe too because you can just open a few cans, toss in some freeze-dried veggies and cook.  I used real carrots in this dinner because I had them, but dehydrated carrots work really well.

I tossed everything in my Saratoga Jacks thermal cooker, boiled for 4 minutes and closed it up for 5 hours.


Minestrone Soup
4 C chicken broth
4 C tomato juice (I use 2 cans of tomato soup+2 cans of water)
1 T dried basil
1 t salt
1/2 t dried oregano 
1/4 t pepper
2 medium carrots (1/2 C dehydrated)
2 medium celery stalks, chopped (1/4 C freeze dried or dehydrated celery)
1 medium onion, chopped (1/4 C dehydrated onion)
1 C sliced mushrooms (1/2 C or more freeze dried or canned mushrooms)
2 cloves garlic (or garlic powder)
1 28-oz can diced tomatoes, don't drain
1 15-oz can white beans, drained and rinsed 
1 1/2 C corkscrew pasta, or other medium shaped pasta

Combine all ingredients, except pasta, and cook in slow cooker on low for 6-8 hours.  Stir in pasta, cover and cook on high for 15-20 minutes.  Sprinkle each serving with Parmesan cheese.

If using a Saratoga Jacks thermal cooker boil all ingredients (except pasta) for 4 minutes, covered.  Place in cooker and let "cook" for up to 6 hours.  Boil pasta and add to soup before serving.  (Pasta gets mushy in a thermal cooker, add it after)

If you are using a Wonderbox you will need to boil for about 10 minutes before putting your pan in your box cooker. Make sure you use a small enough pan that you don't have space for air.

Serve with yummy homemade french bread.

Sunday, April 15, 2012

Food Storage Gadgets

Print Friendly and PDFPrint Friendly
I love finding new (new to me)  food storage gadgets.  This latest find is probably not new to most of you, but I was so excited to order them.

 Canning jar lids!!!  My home bottled chicken doesn't always get used all at once and I keep it in the fridge.  (I am a vegetarian, my kids are lucky they get the amount of chicken that they do)  Many times I bend the jar lids when I pry them off so having another lid that twists on so simply, is a great thing to have!!  I also use them when I make yogurt and on the jars of canned maple syrup. No more sticky canning rings.  The canning jar fits so great in my thermal cooker and the plastic lids are perfect!!

 I bought my lids on amazon and I got 8 for around $6.  Click HERE to see them.  So you see it doesn't take much to excite me :)  But I figured if I didn't know about these, then maybe some of you could use them too!

Thursday, April 12, 2012

Taco Soup For A Year

Print Friendly and PDFPrint Friendly
My Preparedness Binder needs an intervention!!

 I have been going through my preparedness binder and trying to organize all the random info I have gathered and put it all in order. I found a whole section on cooking with food storage and I needed to add it to my recipe binder. 


My Recipe Binder

When I made my food storage recipe binder I wanted all of my recipes in one binder so I wasn't hunting down recipes in an emergency.  (click here to see my recipe binderMy new addition to my binder is an Emergency Food Prep. section.  It contains recipes that require little cooking and use only shelf stable items.  In an emergency I would only have to flip to this section and know I could make a meal on my butane stove or sun oven or thermal cooker. 


I found all of the recipes online in several different places.  Click HERE, or HERE to see some of them.   I have quite a few recipes that I can't find online anymore.  I will keep looking but I think they were from the Blue Chip Group, which was bought out by Augason Farms, and their website no longer contains the recipe book the Blue Chip Group had.  I will keep looking for it because it contained many, many recipes using canned and basic storage items. 


One of the recipes that I wrote down was a Taco Soup recipe. It uses all shelf stable items and would be easy to make in a thermal cooker or wonderbox. Along with the recipe was a list of ingredients to have on hand to make it 12 times a year.  If you made this once a month for your family for a whole year you would need.....


Taco Soup
12 pints (12 lb canned ground beef or equivalent of TVP)
12 packs taco seasoning (or make your own mix)
12 packs ranch dressing salad mix
12 15oz cans kidney beans (or cook your own 12x1/2C)
12 15oz cans black beans (or cook your own 12x1/2C)
12 28oz Rotel Mexican style diced tomatoes
12 cans whole kernel corn 
12 3oz cans diced green chilies
Dehydrated onions 24 T (enough for 1-2 T onion for each recipe)
Sour Cream powder (for garnish)
Cheese (freeze dried)
Ingredients for homemade tortillas


To prepare one dinner:
Brown 1lb beef and add 1-2 T dried onion.  Add the beans, seasonings,tomatoes with the juice, corn (only drain if you have extra water, if water is scare use the water from the corn), and chilies.  Simmer for 30-1 hour on low.  In a slow cooker:  4-6 hours on low, 6-8 on high.


Make homemade tortillas and cut into strips.  Fry in a little oil.  Serve the soup on top of the chips, with a dollup of sour cream and cheese.  


If this is something your family would enjoy, go get the ingredients today and have the peace of knowing you have at least one meal done!!  Maceys grocery store has most of the canned items as part of their case lot sale until 4/24/12.

Monday, April 9, 2012

Prepare Today Homemade- Cottage Cheese

Print Friendly and PDFPrint Friendly
Making cottage cheese is one of those skills that I want to know I can accomplish before an emergency.  There are many recipes and how-to's on the web but this recipe is by far the easiest to make.  My friend Jodee sent it to me and I like this recipe because it doesn't require any weird ingredients that you wouldn't normally have on hand.  I make this recipe when I need a ricotta filling for stuffed shells, lasagna roll ups, and ravioli.  To eat this as cottage cheese I would add a dollop of sour cream or plain yogurt to make it creamier. 

 Powdered milk and vinegar are all you need to make cottage cheese.


After the milk is heated you will need to drip the vinegar around the edge of the pan and I like to use a medicine dropper.  


Add 2 C of water and 3/4 C powdered milk to a pan and stir with a whisk until the milk is incorporated.  Turn the heat on to medium and stir continuously until the milk starts to steam.  

Once the milk is steaming remove the pan from the burner and gently drip 3 T vinegar around the edges of the pan.  Gently stir once or twice and let the pan sit for 1 minute.

 The milk will start to curdle immediately.  The whey is yellow in color and the cottage cheese is white.


Pour the liquid into a small colander and run hot water over it and then run cold water over the mixture until all the whey has drained off (about 1 min)You can save the whey to put in smoothies, use as plant water, or into any baking that requires water.  

 You'll end up with about 1 C of cottage/ricotta cheese.  I use a fork to squish the remaining water out.

 This is the amount you'll get out of one batch.  The last step is to salt to taste.  I made three batches to equal about a 16oz container of cottage cheese.  I am making lasagna roll-ups for dinner tonight and that should be enough.  For a creamier cottage cheese add a small amount of sour cream or plain yogurt.

Cottage Cheese
2 C water
3/4 C powdered milk (non-instant from the cannery)
3 T vinegar (or lemon juice, vinegar is cheaper)

Combine the water and powdered milk in a pan and whisk until combined.  Turn on heat to medium and heat the milk, stirring constantly, until milk starts to steam.  Once steaming, remove from heat and slowly drip the vinegar around the edges of the pan.  Stir gently once and let sit for 1 min.  Pour into a small colander and rinse with hot water, then cold water until all the whey is gone and water runs clear, about 1 minute.  Using a fork press the remaining liquid out of curds.  Salt to taste.  Use in any recipe calling for ricotta or cottage cheese.  To eat is as cottage cheese add a small amount of sour cream or plain yogurt. 

And hey, if it doesn't work you could make some of THESE!!

Saturday, April 7, 2012

Meals In A Bag

Print Friendly and PDFPrint Friendly
I have mentioned Meals In A Bag before but it is a method of food storage that makes meal time so easy.  A complete meal is stored in a bag with all the ingredients and recipe attached.  The bagged meals are stored and can be used for easy dinners on time-crunched evenings, for neighbors in need, if mom is sick and the kids (or Dad) has to cook, or even for a quick meal anytime.  They also make great shower gifts for bridal or baby showers.  The book "It's In The Bag" is a great resource for making meals in a bag, but you can also use your everyday meals and convert them into a bagged meal.  

Every night when I make dinner I am always thinking in the back of my mind if the recipe I am using could easily be converted to a bagged meal.  As I made dinner tonight I knew I had the perfect recipe for a bagged meal.  Every ingredient in the recipe had a dried food alternative.  I was so excited to share it with you!

Parmesan Chicken with Bow Ties
 I made Parmesan Chicken with Bow Ties for dinner with fresh chicken, onion, and Parmesan.  I'll list the recipe with the before and after ingredients.  

Parmesan Chicken with Bow Ties

-12oz bow-tie pasta (I just dumped a 1lb box into the water)
-salt and pepper to taste (this + the garlic powder will go in a baggie)
-2 T olive oil (this is the only ingredient not in the bag.  I have it in my kitchen and storage)
-2 C small broccoli florets (1 C freeze dried broccoli or dehydrated in a baggie)
-1 1/2lb chicken breasts or tenders, cut into 1/2" pieces (one jar home-bottled chicken or canned chicken)
-1 small onion, finely chopped (1/4 C dried onion in a baggie)
-2 cloves garlic (1 1/2 t garlic powder)
-1 C chopped tomatoes (1 can diced tomatoes)
-1/2 C grated fresh Parmesan (grated Parmesan in bottle)
-A couple bottles of water to cook the pasta.

Cook the pasta according to the package directions, about 10 minutes.  Add the broccoli for the final 3 minutes.  Drain, reserving 1 C of the cooking liquid.  Toss the pasta and broccoli with 1 T oil. 

Warm the remaining oil in a pan over medium-high heat.  Add chicken, onion(reconstituted), garlic, sprinkle with salt and pepper.  Saute for 5 minutes, add tomatoes and saute for 2 minutes more.  Toss in pasta, broccoli, Parmesan, and 1/2 C cooking liquid.  Add more liquid if dry.  

I put the broccoli in one baggie and the onion, garlic powder, salt and pepper in another bag.  I need to put the onion in a bag all by itself so I can reconstitute it without the spices with it.  I am learning along side all of you :)

Here are all the ingredients ready to go in the bag, except for the water.  I forgot to put it in the photo.

One Parmesan Chicken with Bow Ties ready for the storage room.  I keep the recipe in a CD envelope on the front of every bag.  This way my children or husband can also make the meal.  Plus I wouldn't have a clue later on what all the bags in my storage room would be.  This meal could also be prepared on a butane stove if you didn't have power.  A complete powerless cooking recipe!!

Monday, April 2, 2012

Prepare Today Homemade- Quinoa & Carrot Pilaf

Print Friendly and PDFPrint Friendly
I have been trying to cook using grains other than rice and pasta.  Quinoa was on sale and I bought a bunch, so now I don't have any more excuses not to use it.  This recipe comes out of one of my favorite food storage cookbooks called "The Essential Food Storage Cookbook" by Tami Girsberger & Carol Peterson.  (Tami has a great preparedness website)

Quinoa & Carrot Pilaf (from The Essential Food Storage Cookbook)
2 T oil
1 small onion chopped (3 T dry onions, reconstituted)
2 garlic cloves, minced
1/2 C chopped carrot (I used 4 carrots, more veggies the better or use dehydrated carrots, about 1/4 C dry)
1 C quinoa, rinsed or it will be bitter
1/4 C water
1 can chicken or vegetable broth
1/4 t thyme
salt and pepper to taste

In a saucepan heat oil over medium heat.  Add onion, garlic, and carrot; saute stirring frequently until soft, about 5 minutes.  Stir in the quinoa, water, broth, thyme, salt, and pepper.  Bring to a boil and reduce heat to low.  Cover and simmer until all liquid is absorbed, about 10-15 minutes.  (Mine took almost 20 minutes)  Let stand 5 minutes.  Fluff with fork.  Serves 4 

It makes a great side dish and all the kids ate it!!  I am kicking myself for not trying quinoa a long time ago! 
Related Posts Plugin for WordPress, Blogger...